


National Center for Health Promotion and Disease Prevention
 Prevention
- National Center for Health Promotion and Disease Prevention Home
 Healthy Living
- Preventing Diseases
- Influenza (Flu)
- MOVE! Weight Management Program
- Patient Centered Learning
- Veterans Health Library (VHL)
- For Clinicians
- Publications
- About Us
- More Health Care
- Veterans Health Administration
- Health Benefits
- Conditions & Treatments
- Wellness Programs
- Locations
- Research
- Special Groups
- Careers, Job Help & Training
- About VHA


Patient Engagement Toolkit
All done. Thank you for your patience.
Please wait...
Getting Started with the Patient Engagement Toolkit
Would you like to learn more about Patient Engagement? Read about this core tenet of the PACT model on the Patient Engagement overview.
![]() View practices, resources, real examples, and quotes from staff and patients. Review all of the content, isolate specific portions or filter by topic. Choose items to keep in the Toolbox. Then extract it in email, print or clipboard.
View practices, resources, real examples, and quotes from staff and patients. Review all of the content, isolate specific portions or filter by topic. Choose items to keep in the Toolbox. Then extract it in email, print or clipboard.
![]() PLEASE NOTE:
PLEASE NOTE:
Toolbox content is not saved. Closing this page clears Toolbox content and selections permanently. Collect and manage Toolbox content before closing this page.
![]() A description for each filter topic can be reviewed by clicking the "i" icons to the right of each filter. When finished, click the icon or the text bubble again to hide it.
A description for each filter topic can be reviewed by clicking the "i" icons to the right of each filter. When finished, click the icon or the text bubble again to hide it.
![]() To view detailed instructions on using the various functions of this Toolkit, click the Toolkit Help button at the top of the Toolkit. For further help, you may contact us by email.
To view detailed instructions on using the various functions of this Toolkit, click the Toolkit Help button at the top of the Toolkit. For further help, you may contact us by email.
Toolkit Instructions
Basics
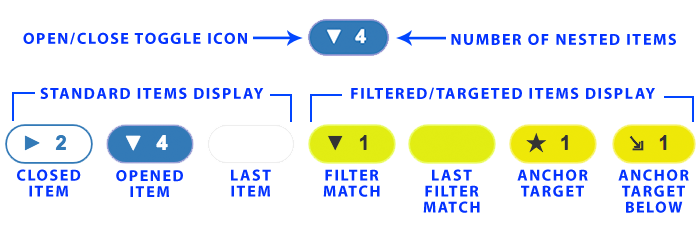
- Toolkit Item Counter
- This counter is placed after the filter box and before the Toolkit content. Total Items refers to every item at every level of the nested content. By default, the counter will display only the total number. When filters are applied, an additional counter is displayed to the right of the total. This additional counter will display the total number of filter matches. This filter match counter will be highlighted with yellow.

- Master Content Toggle
- Below the filter section, there is a Toolkit item counter and a button. That button is the Master Content Toggle. Clicking this will open or close all items in the toolkit. Since the Toolkit is so large, clicking this may result in a short delay while all the items are opened or closed. The master content toggle has no effect Toolbox content.
- The Master Content Toggle will be available at all times except when a filter is applied. Clicking the "Reset Filters" button, returns the Master Content Toggle.
- By default, when the page loads, all Toolkit content will be in the opened state. You may click the Master Content Toggle to close everything and conserve screen space.
- TIP: If you find yourself overwhelmed or lost with content selections, you can always toggle the Master Content Toggle to "reset" the Toolkit content display
- Content Item Toggles
- To the left of each content item in the Toolkit is a pill-shaped button with an icon and a number. Click these to open or close the content the related content under that item.
- The number on each toggle indicates the number of related items nested below the item in view.
- The toggles may display different background colors. White (or clear) indicates the sub-items are not displayed (i.e. closed). Blue indicates the sub-items are displayed (i.e. opened). If the item is yellow, that means that item is a match to filtering options. Items that have no nested items will display an empty toggle with a light-gray border. Filtered items with no nested items will display an empty yellow toggle.
- Content Item Toggles have no effect on Toolbox content.
- TIP: By manually toggling a content item, that toggled state (opened or closed) will remain in the state you set unless you apply filters or use the "Show All/Hide All" toggle. So, if you have a small section opened but you want to conserve screen space, you may toggle closed the highest parent item to hide close that item. This will leave each sub-item's opened/closed state as you set it, so you can simply open the parent item again to once again display the items you left opened.
Using Filters
To isolate the content to specific topics, click the Filters bar to reveal filtering options. Select each topic you wish to include. Then click the "Apply Filters" button at the bottom of the filters box. It may take a few seconds, but matched content will be shown below the item counter. The counter will now show the total items in the toolkit as well as the total matched items beside it.
 Items that have matches will display a yellow toggle button to the left of the content.
To show all the content in the toolkit after filtering, click the "Reset Filters" button at the bottom of filters box. Resetting the filters will toggle all content to the opened state and display the Master Content Toggle.
Remember that selecting more than one filter item will cause the toolkit filters to look for items that have ALL of the selected topics. So, using multiple filters may result in no matches. If you are getting no matches, reduce the selected filter items and try again.
Close Toolkit HelpUsing Anchor Links
Anchor links are hyperlinks that target a specific point or content on a web page. The PE Toolkit enables the use of anchor links to target specific content items. After each Toolkit content item, there is an icon that looks like two chain links. Hovering over the icon will display the tool tip which provides that item's anchor. It will look similar to this: #1-3-2-1-1.
If you click the icon, the page will automatically scroll so that item is at the top of the browser window (as clicking any normal anchor link should do). This also changes the URL in the address bar to include the anchor at the end. The address should look like this:
https://www.visn4.va.gov/VISN4/CEPACT/PE_Practices/PE_tools.asp#1-3-2-1-1
Note the hash/pound sign and item number at the end.
You can now copy that URL and share it or bookmark it. When the PE Toolkit is loaded using an anchor link in this way, the PE Toolkit will open all items preceding the targeted item and display the target's button in yellow with a star. The page will also scroll to where the targeted item is in view.
Using the Toolbox
The Toolbox at the bottom of the page is a way to collect or "shop" toolkit content. You can add examples individually or select an entire section with one click. The selected content is placed in the toolbox so you can continue browsing the main content and manage your Toolbox content when you are finished.
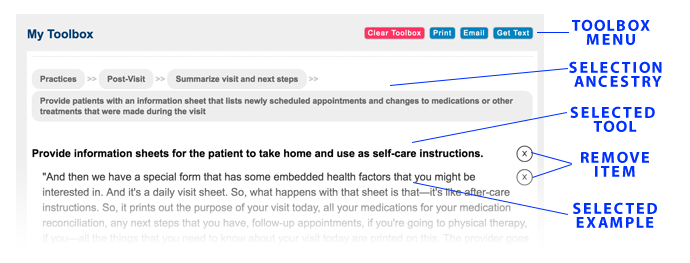
When you find items you would like to implement at your facility, you may select the "KEEP" checkbox to add it to the toolbox at the bottom of the page. You may then choose to copy your toolbox content, email it or print it.
Each content item in the Toolbox has an "X" button on the right edge of the Toolbox content area. You may choose to remove items from the Toolbox by clicking that "X" button. This action removes the item from the toolbox, but it also unchecks/deselects the item in the Toolkit content.
When you are satisfied with your selections in the Toolbox, you can choose from several options to manage the Toolbox content:
- Clear Toolbox
- Clicking this button will empty the Toolbox as well as uncheck/deselect all items in the Toolkit content. There is no way to retrieve the Toolbox content or list of selections after clicking this button. Use it carefully.
- This button will convert only the Toolbox content into a format that is ready to print and trigger your device's printing functions. From that point, you may print to any format your device allows.
- NOTE: If you do not have a default printer set-up on your computer, the print button may not respond. If you do not see your computer's print controls window appear, you may need to visit your computer's printer settings and choose a default printer. If you are not able to connect to a printer, you can choose an option that allows you to print to a PDF or another application such as OneNote.
- This button will convert only the Toolbox content into a plain-text version (removing all the "X" buttons as well), open your device's default email application and insert the plain-text Toolbox content into a new draft email. The subject line will be pre-populated, and you will want to replace the default address with the address(es) of the intended recipient(s). Please note that any hyperlinks that may be present in the content will be displayed as they are in the content with the addition of the full URL in parentheses directly after that text.
- NOTE: Internet Explorer (IE) and Edge browsers may not allow a large amount of Toolbox content to be converted into an email. If using either IE or Edge, and the email simply doesn't open, there is likely too much content than is permitted. It is understood that the current maximum character amount allowed is 1800 characters. For reference, the entire Feedback section contains around 14,500 characters. For collecting and sending large amounts of content while using a Windows computer, it is recommended to use the Get Text option and copy/paste the Toolbox contents into an email that you open separately.
- Get Text
- This button will convert only the Toolbox content into a plain-text version (removing all the "X" buttons as well) and open a modal overlay (not a pop-up). The plain-text Toolbox content will be displayed in the content area of the overlay and it will be pre-selected. This means, you can simply press CTRL + C on your keyboard (or use any comparable "Copy" function). Then you may paste into any other document you would like. As with the Email button, any hyperlinks that may be present in the content will be displayed as they are in the content with the addition of the full URL in parentheses directly after that text.
Pro Tips
Use your keyboard's "Home" button to quickly get back to the top of the page.
Use your keyboard's "End" button to quickly get back to the bottom of the page or the Toolbox.
You can pre-filter the Toolkit content by using URL-encoded variables. To do so, you need to know the filters you want to apply. URL-encoded variables are added to the very end of the URL. Steps to do this are below.
- Determine the filter(s) you want to use.
- Convert the name of the filter into a hyphenated lower-case string. If it is one word, no hyphens are necessary (e.g. Phone = phone). But if the filter is "HPDP Coordinator" you would convert this to "hpdp-coordinator". If you want to use multiple filters, create one comma-separated string with all the filters. Do not use spaces. So, using HPDP Coordinator and Phone and Pre-visit, your filter string would be:
hpdp-coordinator,phone,pre-visit - Get the URL of the Toolkit page (https://www.visn4.va.gov/VISN4/CEPACT/PE_Practices/PE_tools.asp) and add a question mark to the end.
- After the question mark, add "filter=" and then paste the filter string after the equal symbol. So your URL would now be:
https://www.visn4.va.gov/VISN4/CEPACT/PE_Practices/PE_tools.asp?filter=hpdp-coordinator,phone,pre-visit
Total Items: 569
Practices🔗
Visit🔗
Prepare patients for visit🔗
Provide patients with a summary of information from their most recent visits🔗
Provide patients with copies of their most recent labs and active medications at check-in, give them time to review these documents, and engage them in conversation about the information.🔗
"Whenever they're checking in at the front desk, they'll give them a copy of their last lab … It gives them something to do while they're sitting there … They'll also give them a copy of their med sheet [medication disposition sheet] so they can check it out." —Nurse Manager🔗
Verify whether there have been any changes in medication status or adherence. If a patient indicates there has been a change, have a nurse provide patient education about the implications of not adhering to medication and what to do if complications arise.🔗
"We ask, every single time people come in, whether they've had any changes in their medications … and we get to catch a lot of things as far as medication changes when people are self-prescribing or taking their medications on or off of themselves without consulting their Physician." —Nurse Manager🔗
"We can talk to them and explain to them either A, why they need to continue taking it or, B, that you'll be alright taking it, but if XYZ happens, you need to schedule a provider visit or Nurse clinic." —Nurse Manager🔗
Have Clerks provide patients with a check-in sheet that asks them to provide the reason for their visit🔗
Have Clerks ask walk-in patients to complete a short screening form that lists the purpose of the visit and which PACT member they are there to see.🔗
"If you're a walk-in patient … you come directly to the desk in Primary Care. We have a little half sheet of paper that people complete, basically stating who they'd like to see and the purpose of their visit." —Nurse Manager🔗
Route a patient's goals that require an administrative task to the individual who can best handle the patient's request. For instance, if a patient's goal is completing paperwork, have a Clerk assist him or her, rather than a Nurse.🔗
"If the sheet says … I need paperwork completed, typically the Clerk is going to help them before the sheet ever gets placed in the [Registered Nurse's] folder." —Nurse Manager🔗
Use the check-in sheet to prepare the patient for conversation with the provider. Have the provider ask the patient for the goal sheet during the clinical encounter.🔗
"If it's a scheduled visit and they didn't check in, then the [Licensed Vocational Nurse] will provide them with a goal sheet and say, 'We know it's your annual visit … but is there anything else that you'd like to accomplish? Maybe you should write those goals down so that you can refer to it when you're talking to [the] Doctor.' because people will forget a lot of times, and then they'll leave the visit and go, 'Shoot, I should have asked him … ' And then the providers are supposed to ask them for the sheet at the visit." —Nurse Manager🔗
Prepare providers for patients' visits🔗
Have clinicians review patients' records prior to visits🔗
Have Nurses review the patient's chart and give the provider an update if providers are too busy to read the past notes🔗
"We review a chart and come up with a few things for the provider so he can be familiar when he comes in, because it's probably been a year. So, he's not going to remember every Veteran. And that's helpful when the Veteran knows, 'Hey, they remember this from my last visit. They care about me,' and so they may kind of care and want to do better for themselves." —Registered Nurse🔗
"I don't know if they need more Doctors, but they need to spend more time reading their patients' records and know exactly who it is you're about to see. Not sit down with them, and as you're sitting there, briefly skim through some notes." —Veteran🔗
Have nurses screen patients and jot down notes about the patient's recent personal and medical history. Then provide these notes to the provider so the patient feels like their provider remembers who they are.🔗
"Another good thing that I like about here and the screening process that we have: I have one provider, my Doctor. We have 900 Veterans. There is no way that this provider is going to remember what's important to the Veteran … So with this screening process we get to screen and we get to jot down some things, what's important to the Veteran … 'What was your last visit for?' Then we give it to the provider. He gets to read over it before he goes into the room, so he can seem to be more familiar with the Veteran. And they won't feel like, 'I'm just a number out here … This man doesn't know me.' So, it works. It works." —Registered Nurse🔗
Have Nurses scrub a patient's charts before the patient's scheduled appointment date. Reach out to patients if any additional screenings or testing are needed in preparation for the appointment.🔗
"The other way is to, again, collaborate and find the tools to be able to fully implement the model for your little teamlet. So, scrubbing is a key way to do that because now you're anticipating problems ahead of time and you're delegating out to whomever's got the energies to do it—to call the patient or secure message the patient and ask them to take care of stuff ahead of time." —Health Behavior Coordinator🔗
"If their labs are due … diabetics, you can tell them to fast if it's a certain length of time that they can fast. You don't want to ask them to fast in the afternoons for their cholesterol screenings, that way you can let them know that their cholesterol is due, and that's a 12-hour fast. So, there's a lot of things you can talk to them [about] over the phone." —Licensed Practical Nurse🔗
Review a patient's chart before the visit to determine whether there are any co-morbid health needs that need to be addressed.🔗
"Let's say that someone is coming in today because … they can't walk on their ankle. We'll look at the ankle and take care of that, but before they get here we'll look at the chart, see what their labs are, see what they need help getting involved in … We'll get him hooked up with whatever he needs to fix other problems—his blood pressure, his diabetes. Is he controlling that?" —Registered Nurse🔗
Build rapport with patients🔗
Communicate clearly, honestly, and transparently with patients🔗
Set patient expectations by keeping them informed and aware of any barriers or delays in care.🔗
"If a provider is behind, really focusing on communicating with the Veteran that, 'You're going to be here a few more minutes than we anticipated. Is there anything you need while you're here?' That way, they're not frustrated right off the bat." —Nurse Manager🔗
"We try to set the patients' expectations … So when the patient comes in, say, 'Hey, thanks for walking in … Just to let you know, doc has scheduled patients they're with now. The Nurse is going to see you in probably 10 or 15 minutes. And then there may be a little wait beyond that, but we really want to see you today. So please have a seat and we'll be with you as soon as we can.'" —Nurse Manager🔗
"Better communication with the patient and more involvement with the patient. Don't leave people waiting, call them and say it's going to be an hour and a half." —Veteran🔗
Inform patients before the appointment if their regular Doctor has retired or is no longer practicing at the facility and initiate introductions to whom they'll be seeing instead. Reassure the patients that the replacement provider will be able to fulfill their needs.🔗
"If they're a patient that was normally [with] Dr. [name of Doctor] … who retired, I'll say to them, 'I know you normally would see [name of Doctor], but [another person] is covering for [name of Doctor] until another provider is hired for his replacement, since he retired.' I go through the whole, 'If you have any problems or any concerns, she'll be able to address those for you. If you need any refills on your medications, or if you need any labs, refills, she'll review those with you' and that sort of thing just to kind of let them know that they're not hanging out there with no provider." —Nurse Manager🔗
Have the provider explain limitations to addressing the patient's needs, such as policy constraints. If a patient's request must be denied, explain why. Refrain from making promises that can't be kept.🔗
"As I tell patients, I mean, I'm not a know all/do all. I might not be able to satisfy all your requests. I'll try. And based on the policies, we can go." —Primary Care Physician Leadership🔗
"Other than that, your interactions need to be fair. They need to be honest. You need to never make a promise that you cannot keep." —Patient Advocate🔗
"Be more open and honest about the situation, like my example is: Am I unable to get into the women's clinic because right now it's overbooked? Maybe if they told me that it was overbooked and they are not able to take me right now I would be more understanding, but they don't give you any explanation to the problem that they're having by not being able to schedule you where you need to go." —Veteran🔗
Foster open dialogue with the patient about clinical procedures and screenings. Explain to the patient what the procedures or tests are being done and allow the patient to ask questions.🔗
"She takes his blood pressure, checks his heart rate and temperature. She explains what she is doing, as she does it and also shares the information with the patient once she has the readings." —Patient Visit Observation🔗
"The Doctor used another tool to listen to the patient's heart, explained what the tool was before doing it … The Doctor said it helps him hear some things better, but it's still noisy and still needs to be improved." —Patient Visit Observation🔗
Explain to the patient what you are reading or typing while looking at the computer screen🔗
Share the computer screen with the patient and allow them to review the notes, ask questions, or dispute any notations in their chart. To facilitate screen sharing, consider rearranging the exam room layout or using wireless technology.🔗
"We have changed the layout of our exam rooms. The patients actually now see our screens as well as us seeing the screens. So instead of the patient feeling like our nose is in the computer, and they don't know what we're writing … they actually can see the screen and they have input into what we're putting into their chart." —Primary Care Physician Leadership🔗
"We had a patient one time get their medical records, and they said, 'Four times you wrote in here that I'm obese. I'm not obese. I was just overweight.' Essentially, it's the same word, although I think sometimes when you see it in the written word, it has a different impact. I think it's helpful." —Primary Care Physician Leadership🔗
"In the new clinic, everything is wireless. The provider actually works off of a tablet and everything is projected up on the big screen." —Primary Care Physician Leadership🔗
"Look at the computer and let me know when my next Eye Doctor is going to schedule it. If you have something in the computer, let me know." —Veteran🔗
Have the patient sit beside the provider as the provider explains what they're writing in the computer system. Review the notes related to discussions from the visit and go over clinical decisions.🔗
"I keep my patient sort of next to me. So, let's look at this together. And I use the computers sort of as a guideline, if you will." —Primary Care Physician Leadership🔗
"[The Primary Care Provider] becomes silent again as she enters more data into the computer and then says, 'Give me just a second, I'm coming up with my strategy for you' and then begins reviewing all of the discussions she has had with the patient that day … She then explains all of the decisions she has made regarding his care today." —Patient Visit Observation🔗
Inform the patient when the computer is prompting the questions being asked of them.🔗
"And in the computer, they're reminders that you ask. I'm not asking—the computer's letting me know what to ask … So, when I tell them that the computer's generating the questions, it's not me asking, they're more [receptive to being] truthful and answer them. Opposed to them thinking that I'm doing this myself." —Licensed Practical Nurse🔗
"She then continues with her screening by asking about family history. She mostly faces the computer and apologizes for having to enter everything into the computer." —Patient Visit Observation🔗
Turn your body to face the patient and maintain eye contact while talking🔗
Arrange exam rooms to enable face-to-face interaction between patients and providers. Pause intermittently to make eye contact with the patient when entering information into the computer. Consider using mobile equipment, such as computers on wheels, to allow the provider to remain engaged with the patient while typing or writing in their chart.🔗
"While the Doctor is entering information into the computer and going over the reminders, he is also looking at the patient and facing him especially as he asks questions." —Patient Visit Observation🔗
"When they interact with patients, create a rapport. Eye contact." —Veteran🔗
"She took notes on the walk-in sheet and was speaking directly to the Veteran and making eye contact … In this exam room, the Veteran sat in a chair next to the desk so the Veteran and provider can just look to the side and see each other face-to-face." —Patient Visit Observation🔗
"Part of the videotaping process, we realized that our desks were always facing the wall. And the providers' backs were to the patients a good portion of the time. So, we actually got COWs—computers on wheels—and we got smaller desks so that the providers can always be facing the patients." —Primary Care Physician Leadership🔗
"So again, we made a change; it made us change our structure, our facilities, so that we could actually have face-to-face interaction with our patients. And again, when you're looking at the videotape you go, 'Gosh, how can you have a good patient interaction when your back is to the patient 60 percent of the time?'" —Primary Care Physician Leadership🔗
Elicit visit priorities🔗
Ask the patient if you have met all of their needs🔗
Ask patients to prioritize their needs and concerns. Address their priority concerns right away and then describe the order and timeline in which the other needs will be addressed.🔗
"I don't target everything at once because it's too much. I target one specific area at a time. So, the patient may have 10 issues, but we cannot do that because it's overwhelming. Even for us it would be overwhelming. So, you know, I ask them, 'You pick. Where would you like to go with … your hypertension or diabetes or smoking or whatever it may be.' And they will work one thing at a time, and then once that's successful, we move forward because, one, I don't want to target everything at once. It's just not going to work." —Pharmacist🔗
Listen to your patients, allowing them to dive the conversation🔗
Listen to patients and allow them to ask questions. Share the computer screen with the patient and allow them to review and dispute provider's notes.🔗
"Listen to them. It's amazing what you can find out if you listen. They'll pretty much tell you what their needs are, and then just address those needs and see what you can do to help them out." —Nurse Manager🔗
"They want their providers to listen to what's important to them. It may not be the most important thing with their health issue, but to them it's very important. They want them to listen to them, but not only listen to them but actually acknowledge that they're saying is something that's important … Sometimes it's not the big things that's bothering the patient." —Patient Advocate🔗
"Just listen to me. I know they know what they're doing, but they don't particularly know me, and I know how different things affect me on a personal level. Listen to me and take that into consideration before you make any recommendations as to what I should do with the particular issues or how they should be handled." —Veteran🔗
Show that you're actively listening by allowing the patient to speak with minimal interruptions.🔗
"That is the big complaint underpinning most other complaints is, that I don't feel like you're listening to me. I feel like you're treating me with disrespect. And that makes it incredibly difficult to have any other kind of interaction … Even if they are wrong about something, don't interrupt them and correct them until you get to the point where you can—where that information can be of value. Where they can receive it and hear something other than you don't want to listen to them. That's the first step that has to happen before you can do anything else." —Patient Advocate🔗
Give the patients your undivided attention. If you have to look away from the patient as they are speaking, let them know that they are still being heard.🔗
"The Doctor proceeded with the visit. The Doctor acknowledged he'll type as the patient is talking and instructed the patient: 'Don't feel like I'm not listening.'" —Patient Visit Observation🔗
Allow patients to make their own health care decisions🔗
Ask patients for their opinions on treatment options or other issues related to their health care🔗
Involve the patient in health care decision-making, including if they can adhere to the treatment plan. Listen to their preferences, help them think through their options, and remind them it's their choice.🔗
"Because a lot of times we can [get] caught up in making sure all of the boxes are checked … but let's find out does this really work for the Veteran? Let's find out how the Veteran really feels about this. Let's find out if it's this something that he truly feels that he can do, or does he want to go into … a different direction with this." —Nurse Manager🔗
"[The provider]'s very clear with them; he says what he's going to do with them; he asks them for their input and feedback. And that whole teams asks the patient for feedback, too, and doesn't direct it—and will take no for an answer … The provider says, 'Okay, here's what I'm suggesting, but it's your choice.' And I think that, if you're looking at a best practice type of thing, that would be the optimal piece where they hit it at every stage to have their inputs and their feedback. There are teams that I don't think that do it as well." —Nurse Manager🔗
"I wish I was more involved in my own health care. I wish that they listened to me and made me feel part of the process. Make you feel like you can help yourself and you have good ideas or information. Or at least tell me when I don't have good information." —Veteran🔗
"Be more open minded. Actually listen to the comments that the patient has about what he's observed while on a certain medication instead of going by the textbook and ignoring the patient who is living everyday with his own body that he's observed." —Veteran🔗
Allow the patient to opt out of recommended treatment plans. Directly ask the patient, "What is it that you want?" and "What can I do to help you?" to elicit the patient's preference and empower them to make the final decision.🔗
"I had a patient … nearing end of life. Pretty much, he needed a heart transplant and missed his window of opportunity to be able to do that … and I could just see that he was getting more and more upset because he was spending more time at the hospital and less time at home. I finally had to ask him, 'What is it that you want? What can I do to help you?' And it ended up … he wanted to stop everything. He was just tired of fighting." —Nurse Manager🔗
"So, I was able to get him up to the Hospice unit, and he did pass away. But if I hadn't posed that question, he may have just continued bouncing back and forth between the hospital because nobody asked him what he wanted." —Nurse Manager🔗
"They schedule my mammograms. I see them once a year for flu shot, GYN pap smear. I've had the results always come back negative. There is no problem. I go there every three years now instead of every year and she's like, 'Oh you need to go.' I don't think that's necessary. I really don't need it and I'm finding out that you don't really need to have all those mammograms all the time because the mammograms can be giving you problems." —Veteran🔗
Give the patient say in what goes into their medical record.🔗
"I try to invite them into the process, even when it comes to documenting the note. That screen is facing the Veteran. Say, 'Okay, is that the right thing? Did I get this right? Now here's the plan. Is that okay with you?'" —Primary Care Physician Leadership🔗
"I would like for them to research my case, sit down and give me straight answers. But whatever you indicate to me, I want it in my medical record. Don't tell me to do something, or that you suspect something, and you don't put it in my record." —Veteran🔗
Verify whether the timing of follow-up visits works for the patient and be accommodating if they want to be seen earlier or later than proposed.🔗
"Even coming back for the return visit … I'm saying, 'How about two months from now? Is that okay? Is that according to your liking?' They might say, 'I need to see you sooner' or 'Okay, well, let's make it a month.' That's the engagement." —Primary Care Physician Leadership🔗
Give patients control in non-emergent conditions by allowing them time to think about their treatment options. Encourage them to come in for a follow-up appointment to discuss further.🔗
"Depending on the emergency of the situation … then I just start giving them some leeway … saying that these are the options we have, but you can mull it over because we still have time and maybe call me or set up another appointment and then we can talk more about it. Sometimes they go home and they check the internet because now everything is available and they might call me a few days later and say well, 'I agree with your medication. Let's start.' And so then they have more specific questions and then I mail out the medicine." —Psychiatrist🔗
"Give me more time to talk to them without being rushed, and we need to work on the communication between the different Doctors and the patient to come up with agreeable way of attacking or resolving the problem." —Veteran🔗
Find out what is important to your patients by providing them the opportunity to ask questions throughout a visit🔗
Allow patients to ask all involved team members questions during the visit. Directly ask them, "Are there any questions that you have for us?"🔗
"Often, the patient has an opportunity throughout each segment, whether he's with the [Licensed Practical Nurse], the [Registered Nurse], or the attending, to ask questions. 'Are there any questions that you have for us? Are there any comments? Is there anything more that you want to say that we did not ask?'" —Nurse Manager🔗
"And then, at the end of that, I always ask them, 'Do you have any questions? Any other concerns?' Sometimes they do. It's like, 'Oh, by the way, how are we going to deal with this?' And then we go through that real quick." —Primary Care Provider🔗
Encourage the patient to bring a list of questions for the provider and clinical staff to review at the appointment. Have staff assist patients with generating their questions for the Doctor and provide a pen and paper for the patient to write down their questions.🔗
Provide thorough instructions and explanations when answering questions.🔗
"The patient asks many questions about next steps, his treatment plan, and his operation. He is satisfied at all the answers she gives him, and she clearly explains next steps. She explains who he will be seeing next, how to go about that, and how he can get his cortisone shot. She asks him if he has any more questions. The patient asks about the checkout process and the [Primary Care Physician] explains the new process." —Patient Visit Observation🔗
"What they can do at the time of the appointment is get me answers, instead of setting me up for another appointment to come back when I haven't had the pain rectified." —Veteran🔗
Gather information from patients and understand health contexts🔗
Involve social workers when patients need assistance with non-health related concerns🔗
Consider the implications of a patient's life situation on their ability to adhere to health plans and consult with Social Workers whenever a patient presents a challenging life situation, such as homelessness.🔗
"How is the patient going to take meds if they're homeless? Where are they going to put the meds, one, and where are they going to lay down? ... They don't have any food. How are they going to take meds, but they don't have a proper meal or a place to cook it, or they're living on the street? So, things like that will come up sometimes." —Social Worker🔗
"Now let's say the patient's family member … If a patient has dementia, and the patient's family member has been taking care of … [patient], but she's tired and she wants a break. So, we drag in all the Social Workers and have some care, a respite care type of facility, arranged." —Primary Care Physician Leadership🔗
"Take time with each soldier and show them that you care. If the staff can't do it, if you don't have enough staff, get enough staff to do it. Don't let these soldiers come out here without a house or apartment to go to. They don't have any place to go to. They don't have any money. They don't have." —Veteran🔗
"It tends to get to their psyche. When they have to come from dealing with killing people to go to people who don't care about where they live, how they live, how they make it from day to day, not sharing about what they went through when they went in. Oh, that's hard. That's a lot." —Veteran🔗
Educate patients on the extensive array of services that Social Workers provide and the role a Social Worker can play in their care.🔗
"I don't even think people realize how important a Social Worker is to their group, nor do patients realize how important a Social Worker is to their lives. But we try to sort of open the patient's mind to different functions of a Social Worker, advanced directives, things like this." —Licensed Practical Nurse🔗
Ask patients open-ended questions to better understand their comprehension of their health and health care🔗
Have Registered Nurses assess through open-ended questions what patient understands of their health condition, and then provide that information to the primary care provider before they see the patient.🔗
"We're that middle person getting all the assessment information to provide to the Doctor … So, for our diabetics, a lot of time you would use a lot of open-ended questions. For example, a patient that I was working with, his A1c, the normal is 6 and so he came in with an 11 … Very uncontrolled blood sugar. So how I engage him is: I ask him to tell me, 'What do you feel is making your blood sugars be high?' And using a lot of open-ended questions and that's how they really engage in their care. That's one example. But that applies to several different—You can apply that to pain, you can apply that to a patient with a high cholesterol." —Registered Nurse🔗
Ask probing questions to better understand patients' symptoms and their causes.🔗
"I'm always alert to any signs that they're having trouble managing their care. And if they are, the key, I find, is just ask them about it. You know, 'I noticed your diabetes is not under good control. It used to be. What's happened?' So really just asking an open-ended question I think is really important to do very early in the visit." —Primary Care Physician🔗
"Well, again, you give your patient opportunity to explain. Ask, 'Well, is this a new pain? Is this something that's always happening? Is this a chronic condition? Do you know why you have that? Have other Doctors evaluated you to see what's happening with your hip?' You give the patient opportunity to explain in further details." —Nurse Manager🔗
Ask follow-up questions before the appointment ends to confirm patient understanding, such as "What other questions do you have?"" or "What other information do you need?"🔗
"I think it can always go back to communication to get better, and sometimes it's not that you didn't say it … It's that you didn't confirm that they understood it. Before they leave that day that you say, 'Did you understand that? Do you have any more questions? Does that make sense to you? Do you need any more information on that? … Is this what you heard?' Because sometimes what you say and what you hear is not the same thing." —Nurse Manager🔗
"They need to make sure that, one, I understand what's going on, two, when I walk out of that door, if you're going to tell me, 'I need for you to sneeze,' you put that in my medical record." —Veteran🔗
Ask patients who in their lives could assist them with their self-care and involve those people in the patients' health care decisions🔗
Ask the patient about their support system or family, and engage them in the patient's home self-care management.🔗
"I always ask them do they live alone, do they have family close by, do they have a lot of friends when I do my Nurse visits, just to see if they have a support system, and who it is, and if there's anything they need , can they—do they have somebody they can talk to, that can help them? Like a ride or medications or anything, just to see what their support system is like." —Registered Nurse🔗
Engage family members during the visit and involve the family or caregiver if a patient needs assistance communicating with the provider. Allow the family member to add contextual information and to elaborate when necessary.🔗
"I think it's very important to have … wives, sometimes it's girlfriends, boyfriends, aunts, uncles, grandparents in the room, if that's what they choose to do, and the patient is someone who is of greater need. If somebody is more debilitated, dementia, that kind of thing, and then keep [family] in the front line with regard to the evaluation when the patient is in the room … And then encourage them to … if they have any problems, call us … always call if you have any questions … come in for the follow-up visits—I mean, just about anything you can think of is how I try to utilize their intellect and their time and their efforts." —Primary Care Provider🔗
"Well, I'll give you an example of a Vet[eran] and spouse that I just met with earlier today … So, I suggested that they take the time to come in and we meet face-to-face. Again, I'm just talking with her on the phone. She's saying he's hard of hearing. He's had a stroke, so he has a hard time talking on the phone. So, I felt like when they came in we were able to really build some good rapport … So, I'm able to talk with her and not behind his back because he's here in the room." —Social Worker🔗
Provide families with the training and skills to be effective caregivers, including trainings on how to use health devices that are given to the patient and education about dietary needs or medication administration.🔗
"Well, we do refer to our Dietician quite a bit, which is really nice when they're having a problem as far as sometimes their wife is doing the cooking or something like that, so we bring family into it and have them have a consult with the nutritionist and a lot of times that's really helpful." —Registered Nurse🔗
"VA has kind of developed a new program with naloxone auto injector kits and so we do a lot of training with the Veteran, and hopefully with a significant other, on how to use the kit and what it's for. Because if they are found non-arousable by their significant other, then that person, if they know where the kit is and how to use it, can bring the patient right back." —Pharmacist🔗
Provide emotional support and respite care to loved ones so they can be effective caregivers.🔗
"For example … Let's say [patient] has dementia and [caregiver] is taking care of [patient], but she's tired and she wants a break. So, we drag in all the Social Workers and have some care, a respite care type of facility, arranged." —Primary Care Physician Leadership🔗
"I was consulted by their provider for something like homemaker aide or something like that. So, in talking with the wife, you know, I did just a very brief audit, that there may be some VA benefits that they could apply for … I can assess that the caregiver is getting close to burnout. So, I'm able to talk with her about respite." —Social Worker🔗
Mediate family conflicts that could impede patient health or family health.🔗
"So, basically, she came in, she cries, 'I cannot take it. My husband is not taking real care. I'm taking care of the kid with my back pain, with my mental health issues, on medications. And he wants me to divorce.' … So I call my Psychologist and brought her here. We three discussed. I gave her an open option, bring your husband anytime Friday afternoon, and we three can sit and talk." —Primary Care Provider🔗
"We spent one and a half hours talking with her husband and my Psychologist … and we guided them, and he's going to the classes now to learn about depressed and mental health patients or those with mental issues. And they're sending me emails, and they're really happy." —Primary Care Provider🔗
Ask about the whole person to make effective and realistic health plans🔗
Use small talk and other pleasantries to build rapport, make the patient feel relaxed, and learn about his or her personal life to gather context for the medical portion of the visit.🔗
"When I greet my patients, it's kind of, 'How are you doing today?' And the more you see them, the more comfortable they are with you and you develop a rapport. So, some of them will voluntarily say, 'This is going on and I don't know what I'm going to do about this and that.'" —Licensed Practical Nurse🔗
"Patient tells Primary Care Physician about his brother who's in trouble, going into more detail than he did with the [Licensed Practical Nurse] the [Primary Care Physician] expresses sympathy and shows interest by asking him questions and making a few suggestions about ways to get his brother help (brother is a Veteran but receiving medical care at a non-VA hospital)." —Patient Visit Observation🔗
Consider how home and personal life factors will impact a patient's health plans. For example, if the patient is homeless, consider how they will acquire, store, or take their medications.🔗
"How is the patient going to take meds if they're homeless? Where are they going to put the meds, one, and where are they going to lay down? They don't have any food. How are they going to take meds, but they don't have a proper meal or a place to cook it, or they're living on the street? So, things like that will come up sometimes." —Social Worker🔗
Set goals with patients related to their health or health care🔗
Ask and assist patients with settings and achieving specific, measurable, attainable, relevant, and time-bound goals (SMART goals)🔗
Talk about the patient's goals early into the visit, and then reflect on the goals throughout the appointment and at subsequent visits.🔗
"But one of the things that we've done recently to … get at what is important to the Veteran and what is the goal that they want to set is we've kind of standardized a question by our PACT teams where they actually will kind of break away from the normal visit, in a sense, and just ask the patient what is really a barrier for you, what are the goals that you want to set for yourself and your health, and try to touch upon those during the visit. And it just makes it more pointed so to make sure that Veterans actually do get that need addressed." —Primary Care Physician Leadership🔗
"But I think that what we're going to develop … a clinical reminder that's going to be based on the My Healthy Choices tool, and then we're going to develop two levels. The initial level will be like a screening portion of the reminder, and that way the Veteran can come up with the SMART goal, maybe with the staff's assistance … But to make it more of a clinical reminder where it's going to come up—Clinical reminders, we're beat to death with them, and I get that. But we still have to have some type of trigger that's going to trigger the staff into saying, 'Oh, okay. I need to talk to him about this. This is what we talked about last time. How's he doing?'" —Nurse Manager🔗
Co-develop goals that are realistic and attainable for the patient. Use "we" instead of "you" to let the patient know that the care team is there to support them in achieving these goals.🔗
"We set up goals, mutual goals, because it makes no sense if I have an uncontrolled diabetic, to tell them that I want their A1c to be a 6.5, and first of all, he may not understand what an A1c is, but that may not be his goal. So, I have to see what his goals are in life, what his support group is, and try and engage, you know, everything and everyone in his care, so that we get a good outcome." —Registered Nurse Care Manager🔗
Help patients set smaller interim goals that are specific and measurable that help advance them toward their end goal.🔗
"You try to help them to take one day at a time, like small, simpler goals. It's like, if you start with something simpler … something that they can achieve without anybody trying to prompt them … tell me a goal that you can do for yourself that will help you to lose weight. Sometimes, they'll say, well, at least maybe they can walk one block or two blocks." —Registered Nurse🔗
Check in on a patient's progress with goals between visits.🔗
"Following up after the [Licensed Practical Nurse] visit, the call center [Registered Nurses] follow up with the patients who have identified a SMART goal, just to see how they're doing with … whatever they have chosen as their SMART goal. Let's say they're going to walk around the block every night, or whatever. They'll follow up with those patients. As long as patients are agreeable to it." —Nurse Manager🔗
Give patients positive feedback for meeting health goals🔗
Commend patients on accomplishments they make, as small as they may be, toward their goals.🔗
"I try to commend patients on any accomplishment that they've made. If their A1c is 15, but [last] time they were here it was 16, hey, you're going in the right direction. And people generally respond to positive feedback, and so you kind of open them up, like a little flower, to be more and more and more engaged in what they're doing." —Licensed Practical Nurse🔗
Be positive and encouraging as you acknowledge a patient's health goal accomplishments.🔗
"The [Primary Care Provider] ... is very encouraging about the patient's lifestyle choices when they're healthy. In one example, the patient expressed that he has been doing some exercise, but not as much as he would like, and the [Primary Care Provider] replies that as long as he is exercising at the level he is describing, she is happy." —Patient Visit Observation🔗
Educate patients on health care decisions🔗
Educate patients on how or why clinical decisions are made as you make them🔗
Contact the patient if he or she is not there when a clinical decision is made; discuss those decisions and give them the rationale for the decision.🔗
"As a Nurse … if I get something that says they would like to start them on something or they would like to have them take something, then I call the patient and discuss the reasons why, whether it be—maybe it's a cholesterol pill or something like that. If they don't want that, I tell them that's certainly their decision and maybe we can get a nutritionist involved, and they can work on some diet things. And just going over different things that they could do, if what we wanted is not exactly what they want." —Nurse Manager🔗
"Communication. Be more open with other specialists and [Primary Care Physicians]. Getting together with all my specialists and Doctors together. Figure it out. Communicate. Explain to us. Doctors need to explain to us why. Don't be rude and snappy. More explanation and communication. We are listening. Listen to us." —Veteran🔗
Acknowledge barriers that impact clinical decisions. If you are unable to order requested medications or tests, sit with the patient and review the policy that explains the reason you cannot order the medication or test.🔗
"So, I literally had to sit down and review the policy with him—We can't order this for you because of this, this and this. Let's have this test done. Let's see what it says. Let's see what the next step is, and then we could revisit this." —Patient Advocate🔗
"I've had several where they didn't understand the regulations that the provider must follow. I try to tell them, well, this is what the provider must do. And I try to make it easier for them and to understand that this is what they must do, it's really nothing personal, it's a regulation that they have to go through." —Patient Advocate🔗
Review the discussions of the appointment and explain the decisions made regarding patient care that day.🔗
"She becomes silent again as she enters more data into the computer and then says, 'Give me just a second, I'm coming up with my strategy for you' and then begins reviewing all of the discussions she has had with the patient that day. She then suggests that the patient calls before his next visit with her to see whether he needs additional labs, but then states that she believes his labs will be good given the information he gave her today. She then explains all of the decisions she has made regarding his care today." —Patient Visit Observation🔗
Explain the importance of certain procedures and the implications of not getting them. If additional screenings are needed, explain the frequency of the screenings and emphasize why they are important for the patient's health.🔗
"But sometimes, they'll try to tell you, … 'Oh, I don't need no shot.' I say, 'But your Tdap is due,' so once you explain the importance of the Tdap to them, they will agree … and then we do have screenings for colorectal cancer. And then, sometimes, some of them would say, 'Oh, are you going to give me those again? I got those already.' And so, I say, 'Well, I'm looking in the computer, and it didn't say that you got it.' Then I say, 'You got it, you got it last year. This is yearly screening.' And they'll say, 'Oh I'm tired of doing that.' And I say, 'But this is for your own health. It gives us an idea how to treat you and how to help you, so you want to make sure that you get this taken care of.' So, they'll say, 'Okay, go ahead, give it to me.' So—and so, like that." —Registered Nurse🔗
Educate patients on how to take care of administrative aspects of their health care🔗
Guide patients through the steps required to get lab orders completed. Make sure patients know where they can get the bloodwork done and when the lab order will expire.🔗
"The Doctor ordered a lot of bloodwork, explained it would be 50-100 tests and names some of the kinds of tests they would do. He gave the Veteran the option to do it today or next week. The Doctor explained that the Veteran has to pick a day for him to put on the lab orders because otherwise they will expire. The Doctor gave the Veteran a tip about not doing bloodwork today, but to do it next week instead in the morning before his mental health appointment and he will have no wait at that hour. The Veteran agreed; his preference would be to do it next week." —Patient Visit Observation🔗
Educate Veterans on how and when to order medication refills, making sure the patient understands the logistics of medication refill procedures such as how long it takes to process a request and provider restrictions.🔗
"Anything that we can communicate to the Veterans to make them aware of … to have a big part in their own health care … Our job is going to be letting you know, giving you the appointment. But then we're going to educate you on other things, what happens when you miss your appointments. How does it affect you getting your medicine?" —Medical Support Assistant Supervisor🔗
"When asked about her best practices, she said that when Veterans check in and check out, she asks them about their medications and reminds them not to wait until they are out of meds to request a refill because it takes 48-72 hours to process a refill request." —Notes from an Interview with a Medical Support Assistant🔗
"The mail is slow and that has nothing to do with the VA. It is my fault that I ran out of medication. I need to figure out what day to order my meds because it takes 5-6 days to get here and it runs out every 30 days. The VA should improve and tell us when to reorder our meds." —Veteran🔗
Give a patient materials containing the contact information for the department when a consult is ordered and explain that they may need to initiate the call in case the department is backlogged.🔗
"He also reminds the Veteran to be sure to answer when the VA phone number calls his cell. He explained that caller ID won't be able to tell which clinic is calling, and that if the Veteran's voicemail doesn't say his name on it the staff are reluctant to leave messages with any important health information." —Patient Visit Observation🔗
Inform patients if they can take care of additional screenings during that day's visit as opposed to having to schedule an additional appointment for a screening.🔗
"We can let the Veterans know that—for those that are diabetics that they can go downstairs and have their teleretinal eye screen done for diabetics while they're here instead of making an appointment. They can go down and get it done on two specific days. If they don't want to, well then, they can call and make an appointment. But I encourage them since you're here, go ahead and get it done." —Licensed Practical Nurse🔗
Coordinate follow-up care for the patient by connecting patients in need of resources with Social Workers and doing warm hand-offs between providers.🔗
"On a great day in primary care, when we have all of our resources available, which sometimes we don't. But on a great day, we can see a new patient; they can meet with a Social Worker, because there is no issue, which is the best time to meet with a patient … We can do a warm hand-off from triage Nurse to Physician to Social Worker to whatever else needs to happen." —Social Worker🔗
"I'm good for a warm hand-off. I will call and get you an appointment for an eye exam. I will explain, 'Well, you're not eligible for dental benefits, but here are all these resources and these are what your options are.' I just think there's a great opportunity to make it a very fluid and seamless process when we have all of our resource." —Social Worker🔗
Educate patients on the resources and services they are eligible for, including advanced directives. Explain systematic processes and how they can use their personal health record to track appointments, view lab results, and communicate with hospital personnel using secure messaging.🔗
"She also explains systemic processes to him, such as when he asks what would happen if he were to get an 'outside' provider … She also comments on the relative price of obtaining the medications through the VA vs. a non-VA pharmacy, demonstrating awareness of which ones are cheaper to get [and where]." —Patient Visit Observation🔗
Manage patients' expectations by informing them of potential barriers they may encounter🔗
Have the provider explain to the patient how much time they have for their visit. Create a plan for follow-ups to address the needs that couldn't be touched on during the visit.🔗
"We have one provider that's taken the lead role, and he's really educating them on conversations like, 'I've got 20 minutes with you today. I want to address your needs, but I may not be able to address them all. What is your most important need for today? ... And if I can't meet all your needs, I can set up a phone visit for, say, next week where I can have a further conversation with you.'" —Nurse Manager🔗
Inform patients in advance if they have to change providers. Explain to the Veteran who they will be seeing instead and how the new provider will help manage their needs, and discuss any long-term plans to get back with a stable provider.🔗
"What the two Physicians did, people that already had set appointments, they would tell them, like within their last two weeks ... They would let those patients know that they were leaving, they would no longer be their Physicians." —Licensed Practical Nurse🔗
Explain to Veterans how to schedule their appointments. For example, if the appointment slots tend to fill up a few weeks ahead of time, instruct the patients to call 3-4 weeks before their desired appointment date.🔗
"I'll say to them … 'For the most part, your Doctor is usually booked out maybe a month, or maybe a month and a half out, so then I need you to call?' She said, 'Six months.' I said, 'Call me maybe two months or a month and a half before you do, and that way, you can get in.' And they're receptive to that. They appreciate that, she said, 'Hey, thank you for telling me that because I didn't know that' ... Even though we have the recall system, I kind of let them know that, okay, we're not going to rely on that." —Licensed Practical Nurse🔗
Explain to patients how to request medication refills and how long the process takes, as well as who to contact to prevent any delays in medication treatments.🔗
"When Veterans check in and check out, she asks them about their medications and reminds them not to wait until they are out of meds to request a refill because it takes 48-72 hours to process a refill request. Doctors have panels of 1,400-1,500 patients, so they cannot get it done timely to get a refill, so the responsibility falls back on the patient. She reminds them, 'You have to be proactive. Call at least 2 weeks prior to running out.'" —Notes from an Interview with a Medical Support Assistant🔗
Explain that sometimes VHA policies might restrict what kinds of things the PACT can do for a Veteran, but you will still do your best to meet their needs and requests.🔗
"I might not be able to satisfy all your requests. I'll try. And based on the policies, we can go." —Primary Care Physician Leadership🔗
Have Nurses or Clerks explain wait times to patients. The Nurses or Clerks should also ask the patient if they need anything while they are waiting.🔗
"If a provider is behind, really focusing on communicating with the Veteran that, you're going to be here a few more minutes than we anticipated." —Nurse Manager🔗
Educate patients about the PACT model of care, what it means, and what the roles and responsibilities of all team members, including patients🔗
Provide new patients with a customized printout with information on their new PACT team, including pictures of the facility and their team members, their names, and contact information.🔗
"So, [the brochures] are customized … according to the PACT teamlet ... For instance on this one, this is a picture of one of the [Community Based Outpatient Clinics] … so they'll know exactly what it looks like when they present there. This is the composition of their team – this is who they'll interface with. So, they'll have not only a name, they'll have names as well as a face, contact information, and information as to how that Veteran can better utilize that PACT visit." —Health Promotion and Disease Prevention Coordinator🔗
Mail patients educational materials about the PACT model, how the team operates, and how to contact their team.🔗
"So, in addition to education material, up-to-date material, we also want to send them specific information on how we operate. [What] is the PACT? How to access us if they need." —Primary Care Physician Leadership🔗
Make sure Veterans know there is a team model in place, who is on their team, and which team members will help with particular needs. For example, explain which team member will receive their secure messages.🔗
"So, what we do to engage patients is one, you have to identify them in your team…So it's making sure that they know when they come here, you're going to come see us. And there may be times where maybe they will see my surrogate or somewhere else. But for the most part, they can come and leave me a message. They can come and see me. If they call telephone care, it will get sent to me. So they kind of put a face with a name. And they feel comfortable in that it's not going out into space, and it's just floating out there." —Registered Nurse🔗
Explain to the patients that they are an important player on their teams. Ask them what they want from their team, as well as what they will do for their health.🔗
"Well, one of the main things that I do in the process of teaching patients and educating patients and about PACT, I always ask the patient what they are wanting to do." —Licensed Practical Nurse🔗
Post-Visit🔗
Summarize visit and next steps🔗
Provide patients with an information sheet that lists newly scheduled appointments and changes to medications or other treatments that were made during the visit🔗
Provide information sheets for the patient to take home and use as self-care instructions.🔗
"And then we have a special form that has some embedded health factors that you might be interested in. And it's a daily visit sheet. So, what happens with that sheet is that—it's like after-care instructions. So, it prints out the purpose of your visit today, all your medications for your medication reconciliation, any next steps that you have, follow-up appointments, if you're going to physical therapy, if you—all the things that you need to know about your visit today are printed on this. The provider goes over that with them." —Nurse Manager🔗
Create an information sheet template for a document that will travel with the patient throughout the visit. Have the Licensed Practical Nurse record the patient's vitals, have the provider record medication changes and instructions, and have the Medical Support Assistant outline any upcoming appointments on the sheet. On the back of the sheet, provide contact information for frequently-called specialists.🔗
"Actually, they bring us the check-in sheets from the Doctor. They give it to us. And then they get surprised when we give them back and say 'No, we want you to keep this for your records. And on top of that, I'm going to give you these appointment letters, so you can see that it has been made. And I'm going to give you this, because if this person right here doesn't call you, this is what you're going to do'; So, they kind of appreciate that a lot more." —Medical Support Assistant🔗
"And we have these, what we call appointment information sheets. And so, it's something that the Veteran can take with them when they leave so if they have a spouse that wants to know how the visit went, the sheet has the appointment dates, it's got their vital signs, if there's any medication changes. And then on the back of the sheet it's got contact numbers for all of the specialty services and frequently-called numbers needed throughout the [Location 1] VA. And so, they take this sheet with them when they exit and they take it up to the front desk. The [Medical Staff Assistant] verifies whether or not they have any follow-up appointments that need to be scheduled and lets them know if they've got any future appointments at other clinics." —Nurse Manager🔗
"Do some sort of a print-out or checklist—the things we discussed—and put something into the computer that they can print out everything we discussed and give me a copy so I can track it a little better myself." —Veteran🔗
Include general healthy messages—for example, recommendations about diet or exercise or disease-specific healthy messages, such as foot care for diabetics—on the information sheet.🔗
"And then the patient leaves with everything he needs with the discharge sheet that is designed so that the instructions are very clear about what he needs to do today, what his future appointments will be, discharge instructions, who to call, when to call if they're not called, and with some goals of care and some healthy messages that are given about alcohol, safe sex, and things like that. Eating fruits and vegetables." —Primary Care Physician Leadership🔗
Provide patients with a written plan, outlining the goals that have been set, and what steps need to be taken next to achieve their goals.🔗
"And then, I always finish the visit with a written plan. So, this is what we talked about. So, in order to meet the goals, we talk about, this is what needs to happen next. And this is where you need to go. This is who you need to call." —Primary Care Provider🔗
Print the medication list and make mark-ups of all the changes so that the patient has something to refer to when they get home.🔗
"We do this new process of … giving him a medication list. I pull the list. I sit down next to the patient and say, okay, so that's your list. Let me show you what we are doing. The changes we are going to make I'm going to circle … Okay this pill here, I cut it to half. This pill, I'm circling it, I'm discontinuing it." —Primary Care Physician Leadership🔗
Anticipate patients' needs by educating them about the programs or services available to them🔗
Have team meetings with the family and a Social Worker so that patients and their families can learn about the variety of resources available to them.🔗
"They have frequent team meetings that involve the family. The primary care has four or five Social Workers assigned, obviously, to each team and the Social Workers are the, I guess, the frontline folks for the team and so the Social Worker knows that when she inherits a patient, she just tells that patient everything she can possibly think of because it's going to help her in the long run because … it's better to divulge, in my opinion, too much than not enough because if you hold something back or even if it's not on purpose, it can create problems." —Patient Advocate🔗
Have Social Workers or Nurse Care Managers share as much information as possible about programs or resources available to patients so that the patients and their families can decide which available resources are best for their needs.🔗
"The primary care has four or five Social Workers assigned, obviously, to each team and the Social Workers are the, I guess, the frontline folks for the team and so the Social Worker knows that when she inherits a patient, she just tells that patient everything she can possibly think of because it's going to help her in the long run because she's not … it's better to divulge, in my opinion, too much than not enough because if you hold something back or even if it's not on purpose, it can create problems." —Patient Advocate🔗
"So, I make them aware of all the resources that are available to them, should they choose to take advantage of them. Now, sometimes you can't tell everybody everything, you know, at hello, because there's just so much information. But as they go home and think about what we talked about, call me back, and we can discuss things further, and we'll meet at a follow up visit." —Registered Nurse🔗
Have staff offer services or interventions to assist the patient before their next visit.🔗
"The [Primary Care Physician] asks if he wanted a cortisone shot in the meantime before the surgery to relieve some of the pain and the patient accepted. He was really happy when she suggested that, saying, 'Anything that will give me some relief would be great.'" —Patient Visit Observation🔗
Give Veterans a booklet that is updated regularly with the programs, services, and resources available at VA, such as group classes or telehealth programs. Provide copies of the booklet in the waiting areas.🔗
"And any new programs that are happening at the VA, I think the Veterans need to be informed about. One thing that we came up with… is called the [health care guide] that we did just specifically for [VAMC]. And in that book has basically all of our programs that we offer here at [VAMC]… And we keep updating that book as much as possible to stay up to date…" —Patient Advocate🔗
Between visits🔗
Work with extended PACT members🔗
Schedule frequent follow-ups between patients and extended PACT members between Primary Care Physician visits🔗
Have extended PACT members offer both in-person and phone visits between primary care appointments to help support ongoing self-management.🔗
"I know for the PharmD, the two Pharmacists we have down there, they do a lot with blood pressures and diabetes and they'll give them calls, say 'How are you doing? How's your blood pressure readings? Do you mind sending them in, walking them in? How's your sugar readings? What are they like? What's going on?' I know that—and then the Dietician, she also will give them little booklets of 'How are you eating? What are you eating each day?' and she'll go over them with—in their next visit." —Medical Support Assistant🔗
Have extended PACT members provide patient education, review home logs, and assist with goal-setting.🔗
"I do engage people, like in a telephone clinic. So, a lot of times, I tell people, 'Monitor your blood pressure. Monitor your diabetes. Work on reaching these parameters.' And then, they call me and we talk about what they can do to either improve, or what they're doing; is it working or not." —PharmD🔗
"A lot more teaching for diabetes and blood pressure control and … education—more intensive education, more detailed than it was before. We get the patients involved with more specialties like dietary and nutrition. Or we have the PharmDs that do diabetic education for our new diabetics on that—we follow up on that." —Registered Nurse🔗
Schedule recurring appointments with extended PACT members for patients with the greatest need, such as weekly or monthly visits with the PharmD.🔗
"If I see a patient that comes in for the first time that I think really has issues, I will see them once a week for four weeks. Now most people can't do that, but I make it a point to do it even if I have to see him at lunchtime. I want him in here once a week for four weeks, and then I move him out to every other week and then once every three weeks and once a month. But, that's how I'll work with my crisis patients. And if they can't get in here, we set a time for them to call and let me know they're doing okay." —Social Worker🔗
Introduce patients to extended PACT members before referring them for a follow-up with that team member so the patient knows who they will be meeting with.🔗
"So, for example, today I met with a gentleman who came in on Tuesday and mentioned to the provider that he is unemployed and doesn't have stable housing. But he's actually not homeless. He's living with a friend. So, in that case, I'm trying to get better background information about his history, his needs, his preferences, where that aligns with policy in terms of eligibility, educating him all along the way." —Social Worker🔗
Provide patient follow-up calls🔗
Involve the patient in re-scheduling efforts when a clinician cancels an appointment🔗
Confirm with the patient that the rescheduled appointment is on a day and at a time that works for him or her.🔗
"I never schedule any appointment without getting their consent that that's the day they want, that's the time they want and that's the time that I am available." —PharmD🔗
"If anything changes, call and cancel … You have to talk to the patient to make an appointment because they have other things going on in their life—they work, they might be out of town … And that's another thing, they call [to remind] the patient at the last minute from the automated call center. Even if the patient cancels the appointment, it still looks bad even if he didn't set it up. Some clinics reschedule patients without even telling them..." —Veteran🔗
Establish policies that support timely rescheduling of appointments. For example, have a policy that states that rescheduled appointments must occur within two weeks of the original appointment date. Alternatively, create additional appointment slots or consider double-booking one-hour appointment slots.🔗
"With the exception of one team, they all have some sort of guidelines on, okay, if you are [specific PACT]'s team and I cancel you, within 14 days, either put you in an 8:30 slot on these days or overbook on an hour appointment with another patient. And so far, that's worked well." —Medical Support Assistant🔗
Have Registered Nurses use the post-discharge follow-up call to educate patients about their conditions and any new medications resulting from their hospitalization🔗
Use the post-discharge call to education patients about their medications, diet, labs and tests, and why they are important.🔗
"They get to hear that someone from the outpatient environment paid attention, knew that they were hospitalized, cares about their understanding of their medicine. Because we don't treat that like an extension of our job, even though it is. We treat that more like a—almost like a social call. And then we move into the caring components." —Nurse Manager🔗
"And patients, in that five minutes that that call takes, patients get something really good out of it, in that they get their medications gone over, they know when their follow-up appointments are, they know whether or not they've got physical therapy, they know when those appointments are." —Nurse Manager🔗
Contact patients to make sure they have all their medications and understand how to take them. Also make sure that they have the self-care materials and resources they need to keep from being readmitted and are given clear instructions on using them.🔗
"And then we move into the caring components. So, 'What did they tell you about your medicine, because I'm pulling up in your chart right now and it looks like they had you on some IV Lasix in the hospital and they moved you back to oral Lasix, so were you able to pick that up at the pharmacy? Is everything good? Are you taking it okay?'" —Nurse Manager🔗
"The [Registered Nurse] may do a medication review because they talked about that over the phone during their post-discharge telephone call, or the [Registered Nurse] may be following them post-discharge because of congestive heart failure, and she's talking to them twice a week about their weight or something like that." —Primary Care Physician Leadership🔗
Visit patients during their inpatient stay and remind them who is on their PACT team, how to contact members of their PACT team, and that their PACT team is available to support them in their transition out of the hospital and during their recovery.🔗
"We worked with [group] to try to increase the percentage of Veterans that would be seen after they were discharged from acute care. So, it was about—it's been going on two years now where we started off with Nurses going up and visiting the Veteran and doing a negotiated visit. And we would hand the card and say, 'If you don't hear from us within two days, please reach out to us because we want to make sure that you get everything that you need … to transition successfully …' But part of that was that thank you card. Thank you for using us and please reach out to us." —Primary Care Nursing Leadership🔗
Bring patients in for a face-to-face follow-up appointment within two weeks of their discharge to ensure their needs are met and to deliver important patient education.🔗
"And also, we give them a follow-up appointment to see the provider within two weeks of discharge. So, that is very important that the patient get their follow-up discharge appointment … We call them and make sure, and say, 'How you doing today? We noticed you were in the hospital, so we're following up to see how you're doing. Can you tell me exactly what's happening with you now?'" —Registered Nurse🔗
Utilize Registered Nurse follow-up visits to bring back high-risk patients for more frequent goal-setting and check-in activities🔗
Recruit high-risk patients for more frequent follow-ups and intensive care management initiatives to lower Emergency Room and inpatient admission rates.🔗
"And then the other thing we're doing is looking at our—what we call our high utilizers and our high-risk patients using the CAN report. And so, we're—actually leaders of our VISN doing that as well. So, we are actually doing intensive care management by the PACT team, and we've really been able to demonstrate decrease in the readmissions of those folks." —Primary Care Physician Leadership🔗
Conduct phone or in-person visits to support high-risk patients in their self-care activities.🔗
"So, they use those to look and see, 'Oh gracious, I know these Veterans. I think that they would benefit from this.' And so, they basically reach out to the Veteran and say, we'd like you to come in for a visit. And they engage the Veteran with—they ask them how they would like that visit to be. It could be per telephone." —Primary Care Physician Leadership🔗
Collaborate with extended PACT members, such as Clinical Pharmacists, and allow them to participate in follow-up visits with the Care Manager.🔗
"So, we work very closely with these teams. So they, at any time there's medication-related concerns, issues and questions from doc – from the doctors, nurses, patients or Medical Staff Assistant's, it will come to me, and I will try to facilitate…So I work with them to bring the patient in, have a – and I meet with them. And I'm working with your PACT doctor and nurse, and I'm part of the team." —Clinical Pharmacist🔗
Ask the Veteran what they would like to improve and how they plan to do it. Help Veterans stay accountable in achieving their goals.🔗
"They make sure they totally understand, first off and foremost, the disease process, the medication that they're on. Are they taking the medication correctly? And then they really go into all the different things within their lifestyle that could possibly affect their blood sugar. And then they ask the Veteran, 'What would you like, how would you like to—what would work for you to improve?' So, for example, if they say, 'Well, you know, I don't—I'm very sedentary and I would like to—I think if I could just walk three times a week for 15 minutes." So, they set up that goal." —Primary Care Nursing Leadership🔗
Use MyHealtheVet and Secure Messaging🔗
Ensure patients understand the many uses for secure messaging and provide instructions on how to access and understand the records available to them on MyHealtheVet🔗
Encourage Veterans to use MyHealtheVet to look over their medical records and review their most recent test results.🔗
"There are also some resources that they can access through MyHealtheVet. So, I really do… encourage them to log into and get established with MyHealtheVet. Because that also gives them direct access to their own personal record." —Primary Care Provider🔗
Encourage patients to use MyHealtheVet to read articles in MedlinePlus or the Veterans Health Library and watch Healthy Living videos.🔗
"When I say research, that means their health conditions. There's access to what they call the Veterans Health Library that is supported by the same folks that make claims-on-demand information materials. And it's got over 150 videos. Everything from teaching them how to take their blood pressure, what the blood pressure numbers mean, to diabetic information, how to manage their diabetes." —MyHealtheVet Coordinator🔗
"They also have access to MedlinePlus, where they can get on there and research health information about their medications, their conditions. So, there's a lot of tools on MyHealtheVet that will help them manage their care." —MyHealtheVet Coordinator🔗
Encourage patients to use MyHealtheVet to track their self-care activities at home with embedded tools like food or activity journals.🔗
"So like diabetes or congestive heart failure, high blood pressure, coronary artery disease, I tell them to really monitor that stuff really well, and get involved with watching the Healthy Living messages and how they can impact their health and using the food and activity journals…" —MyHealtheVet Coordinator🔗
Encourage patients to use MyHealtheVet as a communication tool to message their PACT team via secure messaging.🔗
"I tell them to use the MyHealtheVet as a communication tool as well as a research tool, because there's plenty of things on there to help them manage their health care at home, or wherever they are throughout the country or the world." —MyHealtheVet Coordinator🔗
"I think that I've seen different Veterans with their family trying to get refills at the clinic and I don't know if they I think they are doing more and more letting people know about MyHealtheVet which I've seen the Veterans very frustrated, mad and there is an easier way about that. I think it's teaching and letting them know what is available for them to use." —Veteran🔗
Encourage PACT members to use MyHealtheVet as a communication tool to send weekly or monthly newsletters with facility, PACT-specific announcements, or notifications to keep Veterans informed.🔗
"We also created a once a month … We were sending out a Healthy Living message that was drafted by the [Health Promotion Disease Prevention Program Manager] with the message of the month, so if it was about healthy eating, or if it was about cancer screening … She would draft that message, and we would email it out to all of the opted-in people … So much like [health care organization] does for me, where I get messages about my flu shots, or that kind of stuff, we would send them emails using secure messaging." —Health Promotion and Disease Prevention Coordinator🔗
Provide patient support materials🔗
Ensure patients are provided with necessary items for self-care, such as blood monitors, and educational tools for self-care🔗
Provide self-monitoring tools like blood pressure cuffs, glucometers, and scales, along with instructions and educational materials about a tool's proper use at home.🔗
"We also provide them self-monitoring tools, like blood pressure monitors, like glucometers, like scales ... Not only do we provide them these self-monitoring tools, we also provide them information in terms of an action plan, in terms of what to do if there are changes in their symptoms." —Primary Care Provider🔗
Bring patients in for a Nurse visit and teach them how to calibrate and use their self-monitoring machines. Ensure the reliability and accuracy of readings from these home monitoring machines.🔗
"What we normally do for certain patients, like blood pressure and blood sugars and things like that, we schedule them a Nurse appointment, and they have their own logs if they don't do telecare—telehealth—we have them bring in their log, and we have them bring in their machine. So, we test their blood pressure on their home monitor, and then we test their blood pressure with ours, just to make sure they—we're getting the right readings. And then she can adjust their medication if need be that day before they leave." —Licensed Practical Nurse🔗
Educate patients about phone apps that may be helpful for tracking healthy habits, like activity and diet.🔗
"The instructor takes out his phone and shows participants a couple of different apps that can help them stay active. One is a MOVE! app called "MOVE! Coach," though he says it's only compatible with some types of phones. He also shows another app that is free and helps track physical activity." —MOVE! Class Observation Notes🔗
Provide patients with sheets listing the names of their core PACT members and their direct contact information🔗
Provide patients with contact information (or business cards) for their providers, PACT team members, and extended PACT team members. Contact information should include their direct phone line and other ways to reach them.🔗
"It's a first visit, I give them my card. I explain all my phone numbers are good on this card. And I tell them how I can be reached. I'm in this room all day every Tuesday and Thursday, for example. And if you're in the building and need something, just come on up here and we'll take care of it for you. Either medically or administratively, we're glad to help in any way." —Primary Care Physician Leadership🔗
"One thing I do is that I give them all of my numbers most of the time. That's mostly worked for a lot of patients because when you give out numbers, most people don't call. But having your Doctor's number or your Psychiatrist's or provider's number is sort of a good anxiety-relieving measure. Right? Because you know that there's a number you can call..." —Geriatric Psychiatrist🔗
"They can call me. They feel very comfortable leaving me messages and sending me emails. They know that I'm there for them. That's real important. I think that's probably the most important thing." —PharmD🔗
Provide an information sheet with a direct number to the Nurse's station or another means of allowing a patient to reach their PACT directly.🔗
"Since PACT began, we started handing out [an] informational sheet to new patients and to patients who were already a part of the VA that provided them with the numbers to the Nurse's stations so that they could get a hold of their provider in between visits if they had issues—medications, medication side effects, the response of treatment was not occurring at the appropriate time, if they were getting sicker—anything, even med refills ... handing out phone numbers was very, very, very—it helped significantly, and it was not being done prior." —Primary Care Physician Leadership🔗
Create a system for call centers in which urgent messages are delivered to the PACT promptly, so they can call the Veteran back within an hour.🔗
"So, we worked with our call center and our Nurses using a mail group to rapidly get messages from our call center to the Nurses when they were high priority needs … So, the responsiveness to telephone calls looks like it's been improving steadily since we made the intervention ... And we've worked with the Nurses to come up with the concept that when someone makes a phone call, that that phone call should be returned within an hour … as a kind of a performance measure. And the Nurses, I mean, nobody doesn't agree that that's a good thing to do." —Primary Care Physician Leadership🔗
Require patients to keep home logs of their blood pressures, blood glucose levels, or other important vital statistics and require Licensed Practical Nurses, Registered Nurses, or Primary Care Physicians to review them with the patients during visits🔗
Use blood pressure logs to get patients normalized to recording and tracking their numbers, and then help them set realistic goals and track their progress.🔗
"That's one of the biggest steps, the first step is just getting them to record their blood sugars, their blood pressure, and things like that, that we check on our visits. So, I try to get them to do that, so they can at least get used to recording. And then, because if they're not going to record it, and monitor it, it's hard to have them control it or set a goal, if they're not going to. So, I try to set the goal, as I will do it for this first—for two weeks and send it in." —Registered Nurse🔗
Utilize Registered Nurses for case management and Licensed Practical Nurses for re-training on using home testing equipment for patients not enrolled in telehealth.🔗
"But for my team … what we normally do for certain patients, like blood pressure and blood sugars and things like that, we schedule them a Nurse appointment, and they have their own logs if they don't do telecare—telehealth." —Licensed Practical Nurse🔗
Establish interim nursing clinics, such as a hypertension clinic, or utilize extended PACT member appointments with Dieticians or Pharmacists so patients can come in for follow-up visits to share and review home logs, get re-trained on how to use self-care materials, get advice and troubleshoot their home health habits.🔗
"If we're trying to adjust something, we'll have them see the Pharmacist in between time or see a Nurse in between time. Keep a log to bring back with them when they come in, that type of thing." —Nurse Manager🔗
Have Medical Support Assistants remind patients what will be expected of them when scheduling follow-up nursing appointments, clinics, or extended PACT visits. This may include documenting their numbers and bringing their logs for the visit.🔗
"So, a lot of the times it's not so much that I'm doing it. I'm just scheduling their appointments and I'll tell them, 'Make sure you're monitoring your blood pressure. Put it on the log and bring it to the Nurse when you come in so then not only the Nurse can see it, but the Doctor is going to see it too.'" —Medical Support Assistant🔗
Have Medical Support Assistants double-check that patients have all required home monitoring equipment before they leave VA.🔗
"When I'm calling them or I'm checking them out, like the doctor brings them to me and says oh, they need a blood pressure check in two weeks. I say, 'Okay, well, do you have a blood pressure monitor at home?' They'll say yes or no. If they don't, I'll send a message to the Doctor and say, 'Hey, can you please send them out a blood pressure pack at home so they have that available if it is.'" —Medical Support Assistant🔗
Use classes and clinics to support patient engagement🔗
Offer a new patient orientation that educates patients about available resources at VA🔗
Organize and facilitate a new patient orientation with the Patient Advocate, education department, or PACT teamlet in collaboration with representatives from other departments.🔗
Facilitate a new patient introduction by mailing materials in advance for the patient to review. Ask the patient to show up early for their appointment to allow ample time to teach him or her about the VA and personal medical history.🔗
"So, we have a new patient that's coming. We get pretty much daily new patients that come to the clinic. The very first thing he's been told—he's been contacted, he's getting an appointment at his desired time. He's told … first visit—be there earlier. We send the brochure to all the new patients ahead of the time. There are some questions that we wanted to have them—general questions—have them answer. They tell them where we are, what the PACT is. These are all some information what either that we send for every new patient." —Primary Care Physician Leadership🔗
"When you get enrolled into the system, it would be nice to get a little review of how the VA works because not everyone knows how an HMO works, and that is kind of how I see it, so that is how I understand it that way. But it would be nice to get an orientation [on] how the system works, what are the [Community-Based Outpatient Clinics] that I can go to, solve problems with medical records, that kind of thing." —Veteran🔗
Provide PACT brochures, handbooks, folders, or packets of written materials to distribute to the new patients for their future reference.🔗
"And again, and we created some additional PACT brochures for new patient orientations … So, this is more of a larger picture of what the PACT experience should be. So … this just talks about exclusively PACT … And what it is, what it should be … it takes the brochure to the next level, basically." —Health Promotion and Disease Prevention Coordinator🔗
Display Veteran success stories and VA resources and programs that helped them to achieve their goals🔗
Collaborate with the Health Promotion and Disease Prevention Coordinator to create a wall with quotes and before-and-after photographs of Veterans who successfully met their health goals using VA programs for support.🔗
"And then the other thing that we've done is what we call our [wall]. And this was a Health Promotion and Disease Prevention—our HPDP staff here locally, they rallied for this, and it took a lot of work to get it up, between Public Affairs and release of information and whatnot, but what we were able to do is, we were able to get photographs of Veterans who had successfully made a lifestyle change." —Nurse Manager🔗
"And so, for instance, I have a picture of Mr. [Veteran], holding up sort of Jenny Craig-style, a pair of pants that he could probably fit three of him in now, in a photo. And then right next to that photo, in the same frame, is his story about the 200+ pounds that he lost, and that sort of thing." —Nurse Manager🔗
Advertise the various VA programs that are available to support Veterans in their health goals through brochures located near or on a wall.🔗
"And below it are the different classes that we offer, all the information, so you can pick them up. All of these classes are on a walk-in basis. The diabetes boot camp is one of them, the smoking cessation class is one, we have a cardiovascular basic training for congestive heart failure patients, and then, of course, MOVE!. And so, patients can see, and be inspired by, the stories of other Veterans who have allowed us to use that, signed the release, and gone through Public Affairs." —Nurse Manager🔗
Establish a "wellness" group🔗
Provide "wellness" group sessions designed for patients with co-morbid health concerns, such as patients with diabetes who are also depressed.🔗
"I have a group that I try to get everyone in. It's called the [group name]. It meets once a week. It has to meet in behavioral health, which is the opposite of primary care, because there's no group space in primary care, so I can't offer groups in primary care. So, I offer that one over there. So, it doesn't reduce the stigma, because they have to go into behavioral health." —Health Behavior Coordinator🔗
"But it's a group where it's, like, all you have to do is set a goal to improve your wellness. And it's really—like, the secret target is patients who are diabetic and depressed. But you can't have a group for diabetic, depressed people because they won't come. So, you have to call it a wellness group." —Health Behavior Coordinator🔗
Have patients set a SMART goal to improve their wellness.🔗
"And basically it's an [Motivational Interviewing]-based group that is focused on folks with any kind of health care concern, [they] can show up and engage with a group facilitator and essentially generate a SMART goal for them to work on over the next coming week or weeks. So that's an example of [Motivational Interviewing]-based group that we have here." —Health Behavior Coordinator🔗
Allow patients to attend as many or as few wellness group sessions as they want. Encourage patients who attend follow-up sessions to share their progress with the goal they've been working on achieving.🔗
"It's not a prescheduled clinic visit. But after the fact, I think it's entered as a group visit … It could be whatever they want. I think she's had the experience of some folks who come in pretty regularly, and some folks who come in once a month. Some folks who just come in once or twice and they just kind of need some help initially setting a goal. And then they're able to kind of go on cruise control on their own once the goal's been set." —Health Behavior Coordinator🔗
Use Motivational Interviewing techniques to help support patients in achieving their goals.🔗
"And basically it's an MI -based group that is focused on folks with any kind of health care concern, [they] can show up and engage with a group facilitator and essentially generate a SMART goal for them to work on over the next coming week or weeks. So that's an example of MI-based group that we have here." —Health Behavior Coordinator🔗
Include peer discussion and education, patient education, and multidisciplinary presentations from expert staff in all group classes and clinics🔗
Have patients learn from each other's successes and struggles and share strategies for effective healthy behavior changes made in their own lives.🔗
"We were able to see some Veterans who were—A1cs were up double digits, 13, 14—and we were able to see them through the course of the SMAs to watch their A1cs come down to single digits, to watch them get engaged with the discussions, because in that group what happens is a lot of times the Veterans themselves will end up teaching each other on different—on, 'Hey, my A1c was here, and these are some of the things that I did, and I was able to get it down.' And that kind of translate with each one of them because now they're actually talking to someone who actually did this, someone who's just like them who [was] having the same problems that they were having, and they actually did it." —Nurse Manager🔗
Have a variety of group facilitators and presenters, such as PACT members (Providers and Nurses), extended PACT members (Pharmacists, Dieticians, Psychologists, and Social Workers), and even specialists from other departments such as Pulmonologists and Cardiologists, educate patients about symptoms, complications, and related diseases.🔗
"Our Pulmonologist, Dr. [Name] will be coming. Several years ago, I thought it would be great to have pulmonology involved with our quit smoking program, so it wasn't just us Psychologists running the program, so that we got the medical viewpoint. And the white coats sometimes can be very effective in getting patients' attention, and also cross-validation of what we've been telling them, hearing it from yet another person who's an authority on lung disease and lung health." —Health Behavior Coordinator🔗
"I mean, there are all sorts of things going on all the time, that are a part of primary care. I mean, our Clinical Pharmacists at various times are running, like, group-type things. Like at one point, they had a hypertension group where they—patients could come in. And not only receive sort of advice and counseling and discussion about hypertension, but learn from, sort of, what the other patients in the group were going through." —Primary Care Provider🔗
Administrative Resources🔗
Environment🔗
Improve telephone responsiveness🔗
Improve telephone responsiveness and provide direct phone access to a patient's care team🔗
Establish performance measures for phone responsiveness.🔗
"We've worked with the nurses to come up with the concept that when someone makes a phone call, that that phone call should be returned within an hour or as soon as possible, but within an hour as a kind of a performance measure." —Primary Care Physician Leadership🔗
"We've got the Triple 8 number that they can always call. I always remind them that those messages are returned within 24 hours." —Registered Nurse🔗
Work with the call center to quickly receive high-priority messages.🔗
"So, one of the things we did this year that I believe is working very successfully … We always had a problem with complaints of people not being able to get their messages returned in a timely fashion. So, we worked with our call center and our Nurses using a mail group to rapidly get messages from our call center to the Nurses when they were high priority needs … So, the responsiveness to telephone calls looks like it's been improving steadily since we made the intervention" —Primary Care Physician Leadership🔗
"I think we respond quickly to their queries through the use of the call center and the call center [Registered Nurses]. Patients are usually gotten back to with their questions or their issues within 24 hours. Sooner if it's something that seems more urgent." —Primary Care Nursing Leadership🔗
Allow patients to contact their PACT team with phone calls or messages.🔗
"We instituted a pilot this past December, we call it a phone pilot, at our CBOC [Community-Based Outpatient Clinic] clinic, where the [Medical Support Assistant] that's assigned to the PACT is the same [Medical Support Assistant] that answers the phone for those patients that call in. And if they're not available—if they're with another Veteran—we got approval to allow them to leave a message on a phone line. And then that [Medical Support Assistant] would call them back … within one or two hours or the same day. And what we saw by implementing that is that we've seen a significant reduction in our telephone waiting times and our abandonment rates and really in improving the average speed of the answer." —Primary Care Lead🔗
"And recently at [Location 3] we started a phone pilot where each of the teams and each of the [Medical Support Assistants] has their own direct line extension. This information has been pushed out to the Veterans through a [Location 3] headliner that we created to make sure that all the Veterans know what their team's phone number is in hopes of having first-call resolution and educating and empowering the Veteran that, if you have an issue, give us an opportunity to fix it. Call in rather than walking in to the clinic. It has really helped with the education piece, getting the Veterans more engaged." —Primary Care Nursing Leadership🔗
Provide the patient with direct contact information for his or her primary care team. Include who to call after hours, how to reach the pharmacy, and how to use secure messaging.🔗
"There is actually a sheet made up for each team with the provider's name, and then under that is the [Registered Nurse's] name and phone extensions, the [Licensed Practical Nurse's] name and phone extension, and the clerk's name and phone extension. And then there's also miscellaneous information that's important. There is a [Telephone Linked Care] extension for when it's after hours or over the weekend so they have somebody to contact." —Primary Care Nursing Leadership🔗
"So those are full-page, front and back, handouts that we give to each patient, so they do have direct contact to their primary care team. And I have to admit, I was leery, especially when we were understaffed, about giving out my own extension … I thought I was going to be bombarded, but that's not the case." —Primary Care Nursing Leadership🔗
"Make it easier to talk to your [Primary Care Provider] about anything. I understand they have numerous Veterans to each team they have. We all need to be able to contact our doctors and say this is what's going and it's not working. I tried contacting via email or phone and it takes two to three months before I get an answer. They need to improve the contact between Veteran and provider immensely." —Patient🔗
Establish a telephone clinic or advice line to respond to patients' questions.🔗
"Then we have my telephone clinic … Say a patient comes here and I want to see what did that change in diet do or what did that change in dose do … Then I can enroll them in my phone clinic and then we can have a discussion over the phone so they don't have to come all the way out here. Or if we're at a point where we have to repeat labs, I can send them to the lab and then just call them with results." —Pharmacist🔗
"And once the Veteran is discharged we let them know that if they need to contact us, they can contact us through our telephone advice program 24/7." —Primary Care Nursing Leadership🔗
Call patients directly to follow up on test results and their next steps.🔗
"Labs, imaging studies, everything on my team, pretty much within three to five days results are sent out to patients or they are contacted over the phone. So they know when they come and do something here, there is a follow-through. It's not that the tests are ordered and nothing is done about it." —Nurse Practitioner🔗
"Other best practices are … the follow-up phone calls, keeping a good line of communication open with our patients … I always try to present to them that we're very accessible." —Registered Nurse🔗
"We try to call them first. Most of our [Registered Nurse] Case Managers do that … They're all really extra calls. They're not mandated to be done. It's just something we've found works, and it keeps people from having to come into the clinic to have a question answered because they either A, couldn't get through when they needed to get through, or got put into voicemail, and they really needed an answer a little bit sooner. It seems to work out well being able to call them." —Primary Care Nursing Leadership🔗
Schedule protected time🔗
Schedule protected time for telephone and secure messaging follow-ups🔗
Designate a daily or weekly time to schedule telephone appointments.🔗
"Our Nurses in our outpatient clinic have a two-hour period between 2:00 and 4:00 in which they schedule telephone appointments … I think one of the things that the VA has been trying to do is to decrease the number of face-to-face visits and increase some of the non-physical visits. And we've been using it." —Primary Care Physician Leadership🔗
Schedule protected time for administrative tasks🔗
Designate half a day twice a week or an entire day once a week for uninterrupted clerical or administrative tasks.🔗
"We do have what's called admin time, when you get a day … Like, today is my admin. So, we had a clinic this morning. This afternoon is my admin. So, we do alerts that we haven't done—go through the messages. And the main thing we try to get done is … Providers have a mailbox. We try to go through that mailbox every Thursday to see if somebody's going to be requesting a letter, or whatever's in that mailbox, to go through it … works fine for us because we're not maxed out." —Licensed Practical Nurse🔗
Work with leadership to get support and buy-in for protected time.🔗
"We just created more administrative time. Our boss was able—[Name of Doctor]—to do that for us. So, now I have way more time to go through my diabetic lists and figure out who needs to be called. Yeah, that definitely helps out." —Primary Care Physician🔗
Employ a team-based approach🔗
Employ a team-based approach within PACT, including extended PACT members🔗
Have ongoing PACT meetings that include extended PACT team members and other disciplines, if necessary. Discuss and educate the staff on pertinent issues and goals.🔗
"They do this every few months. Everybody who is on a PACT meeting will get together. All disciplines. Doctors, Pharmacists, Nurses, Clerks, everybody and we brainstorm. We get a summary of our accomplishments, which … This particular meeting, I actually took notes. What did we do? We got our A1cs reduced." —Pharmacist🔗
"The other thing that facilitates that in primary care in the PACT model is … We've had this for years—we do a once-a-week, one-hour session with all of our managers. Our [Registered Nurse] Managers, Charge Nurses, Team Leads, which are the Medical Directors. And our Administrative Officers. And we talk one hour a week. We have an agenda and then we have other things that come up, so we are all on the same page. So, whether we talk about the OSI (Opioid Safety Initiative) … GI came because there were some issues with trying to do colonoscopies and understanding what the barriers were there in care, and how we can assist with that. So, we have dedicated 52 hours a year to collaborating and talking." —Primary Care Lead"🔗
Ensure extended PACT members, such as Social Workers, Pharmacists, and mental health staff, work close by or are readily available to address any issues.🔗
"So, in doing this new health care center, the PACT teams are … going to sit and all go to the patient. So, in our one area, we're going to have Providers, Nurses, Mental Health Providers, Social Workers and sometimes even specialists in one pod, if you will. And we'll all be able to engage that patient and go to the patient and see them and work in teams. So, we know that's coming. And we're all working in teams to do that." —Primary Care Physician Leadership🔗
"I think that the solution might be to have a Mental Health Provider partnered up with a [Primary Care Provider]. Then the [Primary Care Provider] can contact mental health to coordinate what can be done and appointments for the treatment." —Patient🔗
Use Lync to enable communication between PACT team members regarding an incoming patient's needs.🔗
"What really works well, and we've had to say is that the instant messaging. Because we communicate very well with the medical staff, Office Assistants … allows me and [Colleague] to communicate and say, 'Hey, do you have a moment to see this Veteran?' Or so we can bounce [ideas} off of each other." —Social Worker🔗
"We're really collaborative … If we don't know an answer to something; we instantly Lync one of the other Social Workers and find that information really kind of instantaneously. So that's really essential to providing kind of the best care. Because it's instant communication, not only with the Physician from the [Registered Nurse], but it's with one another." —Social Worker🔗
Ensure the PACT teams and extended PACT teams understand each patient's treatment plan.🔗
"I think that the biggest thing that we do well is work collaboratively with one another and also with other departments and other entities. We try to be consistent. So when a patient comes in or a Veteran comes in, no matter who they're seen by on their team, we try to be consistent with our messages. So we make it a point to meet—communicate with one another, so we all know what the plan is for each patient." —Primary Care Nursing Leadership🔗
"Find out what their needs are. And they may call and say that they're having back issues. And I may send a message to the Doctor and say, 'He's having back pain. This is what's going on. This was his last x-ray. This is what he's taking.' So, then she'll send me a message back and say, 'Call the patient back and tell him I want him to go in and get this done.' … So it's what I like about PACT." —Registered Nurse🔗
"So, together with the Doctor and the [Licensed Practical Nurse], the Pharmacist, the Psychologist, Dietician and the Social Worker, we all work together to take care of our patients." —Registered Nurse🔗
"I think that if they had more of a team concept on peoples' health care then that might improve the quality of health care a little bit … if the total health of the individual was taken into consideration and the providers spoke to each other more." —Patient🔗
Promote clear communication among staff with routine check-ins.🔗
"Like today, I've had to go to a pharmacy and therapeutics meeting today. I'll let my PACT team know where I'm going to be for the next hour or hour and a half. So, if they need me, they can page me. I can step out of that meeting. I'll be here. And all the Doctors have the same courtesy or Nurses—'I'm going to be in this meeting, I'm going to be here and there.' Once everybody knows, then we know how to backfill incase a patient is wondering, 'Why isn't Dr. X seeing me,' 'Oh well that's because she's here, sir. Can we help you?' So, it's all about open communication." —Pharmacist🔗
Have a contingency plan when staff members are unavailable.🔗
"Back each other up—so our tech team is not assigned who has to do this or who has to do that … Really my [Registered Nurse] has to triage the patient, but if the patient comes in—if it's easy and we are busy we're tied up, then my [Licensed Vocational Nurse] will do it. When my [Licensed Vocational Nurse] is doing a heart health medicine and my [Registered Nurse] is available, she doesn't mind doing the vitals of a patient and taking in for my scheduled patients." —Primary Care Physician🔗
Work with Health Behavior Coordinators and Health Promotion and Disease Prevention Coordinators to improve care.🔗
"The other thing I do is I work really closely … with … my [Health Behavior Coordinator] counterpart—to work on … creating opportunities to change the models of care. So, we tried to bring in some care medical appointments, which is new … This whole concept that you would bring several disciplines into one room and invite the patient and their family. And have the perspective of the patient, family member, but also the Social Worker and the Psychologist to kind of moderate the meeting. But then you also have the clinician kind of delivering care—tips on health care. And then the nurse, too—for the diabetes one, you're going to want to get some vitals. You're going to get some clinical stuff that you want the nurse to do. So, we work to do that. We did that for the diabetes. And here, we also do a CHF1—congestive heart failure, which attendance isn't fantastic. But we offer it every week anyway hoping to bolster up the attendance." —Health Promotion and Disease Prevention Coordinator🔗
Establish and maintain stable care teams🔗
Have the Veteran see the same Registered Nurse for better continuity of care.🔗
"I think PACT is perfect if you have full-time staff, both providers and nurses and clerical staff and you have a full PACT team, then it works perfect. But it doesn't take into account the fact that sometimes, you have part-time providers. We try to lessen it as much as possible. So … I have a nurse who works Monday, Tuesday, Wednesday, and then so I try to have her always work with one provider. But then on Thursday, Friday, I have … a different nurse. So, I try to have the different nurse be the same nurse also, so there's that continuity of care." —Primary Care Nursing Leadership🔗
"And so, because we have a whole team surrounding someone now, we've seen that sometimes patients connect a little bit better with the [Registered Nurse] than they do with the provider on that personal level. And so sometimes, the information gets shared with one team member and then they meet as a group and with the patient and are able to address that issue. Where I think, before, in the system that we had before PACT that got a little bit lost because there wasn't that much connection with various people in the health care team. So, we feel like that's important that the patients at least connect on that level with one of the team members." —Primary Care Lead🔗
Ensure staff work at the top of their license during a patient's treatment process.🔗
"It was very satisfying to a lot of our [Licensed Practical Nurses] that we were trusting in them and that they were really able to make a difference in the Veteran's life. And they were really working at the top of their scope instead of just a task-oriented type thing….About two years ago, we realized that we were underutilizing our [Licensed Practical Nurses] and we thought this would be a great way to engage. So we started very small … work group with many different disciplines, Pharmacists, [Nurse Practitioners], myself, [Licensed Practical Nurses]—mapped out the process and the standard of care based on evidence, piloted it, and just took their suggestions and just rolled from there." —Associate Chief Nurse🔗
Set clear expectations for new employees.🔗
"Yeah, I would say that I have—probably, two-thirds of our staff are really stable, and many of them have been with me the entire PACT journey … we did have some folks leave because of the model that we were employing. We do try now to let folks know what that model's going to look like and what their job duties are going to be during the interview and the selection process so that there's really no surprises." —Primary Care Nursing Leadership🔗
Hire dedicated staff.🔗
"I've been personally involved with recruiting our Physicians, and I've been upfront with the Physicians when I recruit them. I say, 'If you're coming to the VA because you think it's a place you can kick back and not do much work, then we really don't want you. If you're coming here because you want to take care of Veterans and you want to work hard,' I said, 'just expect to work 50 to 60 hours a week the first year you're here learning our system.' … And so by getting the right people in our system, it really just does a tremendous amount for the Veteran experience." —Primary Care Lead🔗
Hire staff members who understand the PACT model and philosophy.🔗
"It became apparent to me that PACT is relatively new as a concept, a few years old now, but still relatively new. However, a vast majority of our staff were hired pre-PACT. So, we now hire based on knowledge of the philosophy of PACT and people that are most suited to that." —Associate Chief Nurse🔗
Have daily PACT team huddles with all team members.🔗
Schedule a weekly huddle with the PACT team to discuss the best care options for specific patients.🔗
"Doing a huddle with the Doctors, the Nurses. It helps us to better understand what's going on. During the week, we—the Doctor, myself, or the [Licensed Practical Nurse]—may deal with different patients within our group that we need to all sit down and kind of talk about and say, 'So what do you want to do with this patient?' So I think huddling is a very nice tool for all the staff because then you get to kind of collectively get together and … collectively talk about what can we do to better serve the Veterans." —Registered Nurse🔗
Schedule a daily nursing huddle across teams to address patient flow.🔗
"So, we have a daily nursing huddle and that is awesome. And then we sit down and we talk about what happened the day before with our clients. And then we can try to come up with better resources to … help with the flow of the patients with the walk-ins and the scheduled visits." —Registered Nurse🔗
Meet weekly to focus on education, separate from discussing patients or clinic operations.🔗
"We block out an hour every week for meetings. We're trying to put more education into those meetings and less, 'Here are your numbers.' … We do kudos every week and try to give a lot of good, positive feedback, and we've been working really hard." —Primary Care Nursing Leadership🔗
Support staff members🔗
Create opportunities for leadership to hear and respond to the needs of the frontline staff🔗
Create a customer service committee through which patient advocates can address major patient issues with leadership via weekly or monthly meetings.🔗
"Patient Advocates are part of leadership. And so, we have the monthly customer service committee meetings, and that information is referred up to leadership if there is something that needed to be addressed. Like if there's an issue that's bigger than patient advocacy, we would refer that issue to leadership for review." —Patient Advocate🔗
Establish weekly Clinical Service Chief meetings in which Primary Care Chiefs meet with all staff to address any issues.🔗
"Our Chief of Staff, he has a weekly Clinical Service Chief meeting. Both the Chiefs of Primary Care attend. And again, that's pretty much in an open forum. If there's something anyone wants to discuss at that meeting, they just need to send his assistant an email a day or two ahead of time and say, 'Please put me on the agenda, I'd like to talk about X or Y.'" —Staff🔗
Schedule weekly Service Line Supervisor meetings and have Supervisors meet with Executive Leadership monthly. Bring feedback to frontline staff for discussion and return feedback to Supervisors.🔗
"To try to prevent those siloes to ensure that the teams are working together and we're having the same outcome and goals for our Veterans, we meet weekly. Each Supervisor of each service, we meet weekly. It's a weekly PACT meeting and our union is actively involved in that as well. And then our Executive Leadership team meets with us once a month. So any issues, problems, good, bad—everything's discussed in those meetings. And we really work it out. And I don't want to give the impression that we have supervisors and our executive leadership ultimately making decisions here because by no means would that be correct. We really take things to the frontline staff. And if there are issues or things that need to be resolved, they provide the input and they come up with solutions to make the system work better." —Staff🔗
"We have very good support from leadership … if there are issues that are unresolved and that need leadership attention, I meet with leadership every Thursday, so I tell them straight up, these are the issues that we need assistance with and they provide the assistance." —Patient Advocate🔗
Have monthly leadership meetings that includes the Director, Associate Director, or Chief of Staff to discuss issues within the clinic.🔗
"No matter how much you've communicated or how much you think you're communicating, you always need to communicate more. So, our director has a very active reporting structure for our daily morning report. So, I think it's twice a month … Primary Care comes and reports to management. So, when … there's PACT metrics available, they'll come and report the metrics. But even when those metrics aren't updated, they'll come and just talk about what's going on in the clinics, any challenges they may be facing, say there's—that they need space or they lost an [Registered Nurse] and about recruiting and how are they going to maintain the PACT ratio, that kind of thing. So that's their forum. It's a 30-minute meeting. So that's their forum to come and talk to the Director, Associate Director, Chief of Staff, about any challenges they may have or any good thing they want." —Staff🔗
Promote clear communication among staff via routine check-ins.🔗
"We have a Doctor that is our go-to Doctor and every time we have a complaint … [Name of Doctor] is our go-to Doctor and he always contacts the Patient Advocate the same day of the complaint … So, it doesn't linger … It's almost Johnny-on-the-spot resolved. If he says he's going to tell his provider, which is a Primary Care Provider, to enter a consult in for a Veteran for a blood pressure machine, you better believe that that consult will be entered that day. That Veteran will be contacted and told when to come and pick it up. The follow-through is incredible and that's what I think Dr. [Name of Doctor] has taught his staff is, you have to take whatever the question the Veteran has or whatever the concern the Veteran has and you follow it from A to Z. If you just follow it halfway, you might as well not even have started it. So, follow it from A to Z. Leave no questions. Answer, even think of questions that they might think of, go ahead and tell them. Make it where the Veteran can't ask you a thing because you've covered everything. And that's why we have very few congressionals involving primary care." —Patient Advocate🔗
Support the professional, personal, and emotional needs of frontline staff🔗
Provide opportunities for Nurses to complete continuing education classes.🔗
"They've been really positive here … the Nurses invited me to do a nursing continuing education program for them on contextualizing care on a monthly basis, which I do along with the Primary Care Nursing Leadership." —Primary Care Physician🔗
Bring in Subject Matter Experts on topics of interest at staff meetings. Include Community-Based Outpatient Clinics at these meetings.🔗
"I like to bring in subject matter experts, like if staff has questions or don't understand, or if I see that a problem exists, I will bring in somebody out of that department and come to staff meetings to be able to talk about things. I know the Community-Based Outpatient Clinics, we have [Cognitive Behavioral Therapists]. We keep them abreast of things that are going on … So I'm big at bringing in the people that know, and that way staff understand, you're getting them the answers, and they also can ask questions … That helps them stay engaged, stay trained, really push the concepts." —Primary Care Nursing Leadership🔗
Provide workshops and trainings to promote collaboration across disciplines.🔗
"This coming week, we're going to start doing training for the staff to do the cognitive screening, so we work with Behavioral Health really closely. They're in our area, and we try to support the work that they do, which is awesome. And the staff are going to get started doing cognitive screening, so they're going to get trained on that. We have about ten sessions set up the [Registered Nurses] and the [Licensed Practical Nurses] to learn how to do the cognitive screening." —Primary Care Nursing Leadership🔗
"And we're doing workshops every month for each discipline—so for our [Medical Support Assistant] staff, for our [Licensed Practical Nurse] staff, for [Registered Nurse] staff to not only make sure that their skills are where they should be for the patients that we work with, but also to give them an opportunity to kind of voice their opinion and to give suggestions and to collaborate with one another to try to figure out ways that we can do things that are either more fun, more realistic, more functional … Because we all come from different backgrounds as nursing staff or [Licensed Practical Nurses] or even [Medical Support Assistants]." —Primary Care Nursing Leadership🔗
Ensure middle managers communicate needs of frontline staff to leadership.🔗
"It's just making sure, as the middle managers, we are the connection between the two, and we're not afraid to say, 'Listen, this is what staff need.' And it may not be what your boss wants to hear, but at least you're willing to put it out there." —Primary Care Nursing Leadership🔗
"If my [Primary Care Physician] can get support from the top of the VA to help him with dealing with the issues, I think that is one thing that can be done." —Patient🔗
Create a patient walk-in plan to relieve and support overwhelmed staff.🔗
"Support in the sense of you're not bombarded with walk-ins and it allows you to spend that time with that patient. And the management having leadership in terms of, 'Okay, if I see this person drowning, let's have the team help.' So they will usually look at your load and … if there's a lot of walk-in slips there and you're with a patient for a longer period of time, they ask someone else to kind of help and relieve some of that load, so that lends support." —Registered Nurse🔗
Allow frontline staff to attend presentations on patient-centered care and other topics of interest.🔗
"I know that today one of the Physicians was saying that upcoming they're having three people come to give a presentation on acupressure, which I know is something that's of interest to a lot of patients. So he was encouraging providers to go to that. And then I think we recently had somebody come and give a talk on smoking cessation as well. And in there they talked about how important it was to use motivational interviewing. And I know they—we hear about patient-centered care a lot … There's always a lot of emails and the administration talks about it being something that's really important and that it's important for everyone to take the time to go and do it." —Health Behavior Coordinator🔗
Give frontline staff autonomy🔗
Encourage staff to come up with their own ways of promoting patient-centered care initiatives and use their suggestions.🔗
"The reception area had a printout called PACT Hi Five. This was a reminder to staff on how to engage with patients. The Hi Five was an acronym that stood for the following: Say hi to the patient, focus on their problem, intervene as necessary, value the Vets, and engage, educate and evaluate their needs. This acronym was developed by a nurse on site." —Observation Notes🔗
Work with the nursing staff to identify improvements to be made in patient care.🔗
"Another thing that happens quite a bit actually with the A1c initiative that's going on right now, our Nurses recognized that they could do something to really improve patient care, specifically better glucose control within our Veterans. And a lot of times like a Staff Nurse or an [Licensed Practical Nurse], when they see something and they want to improve, they're not quite sure how to make those improvements. So, my job is basically to help guide … This is how we can pull this together and help facilitate the action." —Associate Chief Nurse🔗
Request frontline staff come up with solutions to feedback given to them.🔗
"Give them an opportunity to kind of voice their opinion and to give suggestions and to collaborate with one another to try to figure out ways that we can do things that are either more fun, more realistic, more functional … Because we all come from different backgrounds as nursing staff or [Licensed Practical Nurses] or even [Medical Support Assistants]." —Primary Care Nursing Leadership🔗
Training🔗
Improve communication skills🔗
Require trainings and refresher trainings for all staff that addresses interpersonal communication skills related to empathy, compassion, and respect🔗
Provide patient engagement- and customer service-based trainings to employees.🔗
"So, from our end, we have implemented a customer service training tool to try to catch at least the new workers—the new employees that come in—so we have a portion of the new employee orientation where we do that." —Patient Advocate🔗
"I think it was a variety of topics. But that one was specifically about patient engagement. It was specifically geared towards—and actually it was … part of new employee orientation … It's an eight-hour class. It's a … interactive class. And it deals specifically with … difficult patients, dealing with family members … and then we saw a couple of short films on dealing with certain situations. How would you deal with this situation? … So, it was … really geared toward customer service." —Patient Advocate🔗
Train staff on interpersonal communication skills such as empathy, compassion, and respect.🔗
"We did the customer service training as well. So we've had quite a bit of training this year as it relates to PACT, as it relates to customer service. The VHA [Veterans Health Administration] director came here … he came here and provided training as well, about customer service and where that's going and where it's headed. So, we've had quite a bit of training at [site name] as it relates to … just dealing with and treating patients with dignity and respect." —Patient Advocate🔗
Host Motivational Interviewing (MI) and/or TEACH for Success trainings🔗
Require trainings and refresher trainings for all staff that address Motivational Interviewing (MI) and/or TEACH for Success🔗
Provide Motivational Interviewing (MI) trainings to staff other than Registered Nurses, including new staff, Providers, Licensed Practical Nurses, Health Care Technicians, Pharmacists, and other staff who interact with patients.🔗
"Usually … Motivational Interviewing was only given to the Registered Nurses. We found that having motivational interviewing given to the [Health Care Technicians] and the [Licensed Practical Nurses] that are usually the ones that are prepping the patients had a huge impact on the ability to really get patients engaged right from the beginning and focused instead of kind of all over the place." —Primary Care Nursing Leadership🔗
"So, the MI … we are going to start doing some trainings. I did training with … some of the Pharmacists in PACT and it was really well received. Everybody's very open to the idea …" —Health Behavior Coordinator🔗
"With the advent of that [blood pressure] clinic, the [Licensed Practical Nurses] were going to be running it and they wanted to make sure that they were equipped with necessary tools to be able to facilitate health behavior change, and so I was able to get them trained in MI. And that's also stressed in that, coming up with SMART goals on meeting patients where they're at and respecting any change, any degree of change that they would like to make, even if it's small or not consistent with what [Nurses] think [the patients] should be doing." —Health Behavior Coordinator🔗
Ensure MI and TEACH for Success trainings are practiced by encouraging staff to use training toolkits.🔗
"We definitely use the toolkits and the motivational interviewing and the TEACH programs … and that's why … you hear me keep saying that … building the patient confidence … are some of the tools that came out of teach and motivational interviewing." —Primary Care Nursing Leadership🔗
Offer MI trainings and refresher trainings multiple times a year.🔗
"I think it also would be helpful for me to have … an MI session once a year or twice a year … because it really changed my practice, and I'm … so early in my career … I think it's really going to end up helping people. And it's really helped me be more effective. I think it's going to prevent burnout." —Primary Care Provider🔗
"I think it helps staff … gives tools to staff. The only thing I would say is if you take some of the trainings, and it's been four or five years or three years or whatever, I think it's good to refresh staff over time." —Primary Care Nursing Leadership🔗
Host trainings on patient-centered care🔗
Require trainings and refresher trainings for all staff that addresses patient engagement and patient-centered care🔗
Cover a variety of topics, such as whole health care coaching and personalized health plans, in trainings.🔗
"We also have two people in primary care … one is in PACT and one is a hospitalist, Chief of the hospitalist section, who are taking on patient-centered care. The patient-centered care movement. We actually had a training—I'm going to say it was last year—where a large number of people from primary care did the Whole Health Care Coaching. And that was when the patient-centered care team sent folks down to train primary care in terms of how to do the Personalized Health Inventory and how to engage in Whole Health Coaching, and then at this point we're drilling that down to implement the tool on a team level in primary care. So that's part of the PACT." —Primary Care Lead🔗
Provide ongoing monthly trainings on patient-centered care topics.🔗
"Yeah, there were four meetings … One is foundations for Patient Aligned Care Team's patient-centeredness. The next one is Engage in Effective Teams Access and Measurements. PACT Roles and Responsibilities, Modalities of Care. And the fourth is Care Management and Coordination Systems Redesigned. And they're offered monthly from 1:00 to 3:00 on different Tuesdays and Thursdays." —Primary Care Nursing Leadership🔗
Implement integrated patient-centered care trainings across sites and include other departments.🔗
"So, we had Nurses, we had Physicians, and we had a few other people from psychiatry—the Mental Health Psychologists came—who are on the teams and that's been a great help as well … I think it engages the patient … And people have tried to basically incorporate that into their practice … We've got two or three primary care physicians at two different sites who [have] a pilot so that we can figure out how to implement that in an integrated fashion into our practice. This is a VISN [##] initiative … because as we look for alternative modalities, for pain and self-care and patient activation, patient-centered care, drilling down to what the patient wants for his goals. It's a big one." —Primary Care Lead🔗
Utilize the Office of Patient Centered Care and Cultural Transformation to train staff on patient-centered care and to assist with implementation plans.🔗
"We partnered with the regional FIT team, which was with the patient centered care initiative … It's the regional FIT team, Field Implementation Team. They work with the Office of Patient Centered Care and Cultural Transformation … They travel to different VISN facilities to help roll out that initiative … do the engagement sessions and train the leaders and the facilitators. We're done with the initial steps of it … We've done most of the sessions. We might have to do a couple refresher sessions for facilitators and such in order to spread it throughout the facility and have more staff engagement sessions for informational sessions." —Patient Advocate🔗
Host PACT model training sessions🔗
Require trainings and refresher trainings that educate staff on the PACT model and their role in PACT implementation at the facility🔗
Provide mandated trainings and refresher trainings on the PACT model and its implementation to all PACT staff.🔗
"We offer what's called a PACT 101 … So when PACT initially rolled out, they would—there was a travel team that would go and get trained about PACT. And then they would come back and they were supposed to teach the rest of the staff. But for whatever various reasons, we kind of took the HPDPs [Health Promotion Disease Prevention]—took that over with the leadership in primary care and the HBCs [Health Behavior Coordinators], which are the Health Behavior Coordinators. And so, we took that on to really teach the staff about what PACT is." —Health Promotion Disease Prevention Coordinator🔗
Build PACT training into new employee orientation.🔗
"But now what we do is we have PACT training built into the new employee orientation so that for the new people coming on they get it." —Primary Care Lead🔗
"We do a [Nursing and Provider] orientation … and I know [Project Manager] does an orientation as well that focuses on philosophy of PACT." —Nursing Staff🔗
Create a PACT handbook for staff.🔗
Establish a PACT teaching team to train staff on implementation and follow up on metrics.🔗
"Two years ago they rolled out this … PACT teaching team together for PACT implementation. And so it was led by … our Nurse Educator … the Health Prevention Program Coordinator and the Behavioral Psychologist. And then we had a Physician and a Nurse Lead. And so they went to each of the sites, went over the PACT principles and what are the assignments and what are the jobs of each of those folks. And then—it was basically an all-day training and then they would follow up with them with the PACT metrics." —Primary Care Lead🔗
Provide training support🔗
Create a culture that prioritizes training, including protected time for trainings, relevant trainings, and refresher courses🔗
Allow staff to embrace trainings aimed at improving patient-centered care.🔗
"We have to really change the mindset of our team members in the PACT, in terms of how they approach patients to make it more patient-centered. So a lot of our efforts over the last—past year have been to set the foundation for the successful implementation of patients being more engaged in their health care. And that began with educating the staff on motivational interviewing and TEACH training for a hundred percent of our staff. Joint Commission requires it for the nurses' service, but we're actually looking to … have our health care providers complete it as well." —Primary Care Lead🔗
Provide multiple, brief refresher trainings to ensure the staff fully comprehend the given topic.🔗
"The new employees always have to go to the various trainings. But … I think that it's not only the initial training … to me, you can't have employee engagement without the team being actually engaged, too … and they have to buy into the concepts, and I'm not talking about the same training … training, education materials, things that are relevant, but not so time-consuming that the staff has to spend all day in something and they're not focusing … To me, you have to increase the staff's engagement to make sure you have a high-functioning staff that's a team that's going to want to make sure they engage their patients. Otherwise, you're just coming in and seeing the patient and they're going, and you're missing that important piece." —Primary Care Nursing Leadership🔗
"I would say make sure that you have committed trainers and if it is a train-the-trainer kind of thing, that you get somebody who's really engaged, who's going to promote it. And then offer a lot of sessions because we're all really busy and the priority is the clinical work, but the training is important too. So, people have to be flexible to recognize that you're not going to do a one-shot training, ever. It's probably going to take three or four, or even more than that, depending on how many people you have to give the information out to. Just make the commitment." —Primary Care Nursing Leadership🔗
Ensure protected time and maintain clinic coverage so staff can attend trainings.🔗
"But in terms of actually getting people trained, having time carved out by the management where they're required to be there, really seems to have helped." —Health Behavior Coordinator🔗
"We have mandatory trainings, for two hours in the morning … they cancel all the clinics." —Primary Care Lead🔗
Communication🔗
Create customized programming🔗
Provide customized programming to TVs and electronic bulletin boards in the waiting rooms to educate patients on health topics and services that are available at the facility🔗
Create health-related content for the televisions and e-boards in waiting areas to promote education and outreach.🔗
"Well, I think a lot of the more electronic media is being used to reach out to patients and make sure they know that we want them to be engaged. We have the video boards, e-boards around the facility, and we get healthy living messages posted there." —Primary Care Nursing Leadership🔗
"And then they [patients] would go have a seat in our lobby. We do have a new TV in our lobby that we're showing educational materials. We've got several DVDs that are just health promotions and disease prevention DVDs. And we also have one that [Local University] helped us to create that shows little clips that are VA videos that just run one after the other for about an hour. And we show those on our lobby TV so they're getting educated as they wait." —Primary Care Nursing Leadership🔗
Create TV schedules with customized programming for the different clinics to deliver targeted education to specific Veteran populations (e.g. wound care instructions on the TV in the surgical waiting room).🔗
"There's a project I was working on, and it has since come to a screeching halt because of finances. It was patient education television. And we put 16 TV's—there are four in the hallways, and then we're use—we were using existing TV's in some of the main areas, like where all patients would have to go through—lab, radiology—what's another one? Surgery clinic, medical clinic. And we were going to pipe in patient education processes, announcements—I mean use it for everything in the clinics. And that was a huge—that's a four-year process. Four years we've been working on it for it to come to a screeching halt." —Health Promotion Disease Prevention Coordinator🔗
"And it's not just like a CCTV (closed circuit TV)—you'd be able to program the TVs. You can program and say, 'Okay, in surgery clinic, at 10:00, I want to do wound care because that's the day that all the patients come in for wound care.' Or, 'Let's show in—across the board—let's show everybody how to do … prescription refill. Let's talk about that.' Or, 'Let's tell everybody about diabetes.' All right. 'Let's just focus in X-ray about this particular procedure, the recovery or whatever.' And different things like that. And you were able to schedule it. And we have three designated computers that were to program into the—those TVs. Yeah, so there was a lot to it and everything and then came to a screeching halt because it's not quite working right. And then, to try to get our IT department with the company that installed it was a challenge because we had to keep bringing them back with money. And so, that came to a screeching halt." —Health Promotion Disease Prevention Coordinator🔗
"VA should offer more visual stimuli for women Veterans about mental health care and services that are offered. We have TV screens telling about nutrition, but education on the screen specifically directed at women Veterans to try to get them more interested to go to clinics and groups so they don't take so long to get on the road to recovery, so to speak, from my experience … More visual stuff up there encouraging female Vets different clinics or things that are offered." —Patient🔗
Create program guides🔗
Create a program guide for patients and staff detailing programs available at the facility🔗
Create a program guide for patients and staff in two formats—alphabetical and calendar—and include when and where the programs take place and which programs are broadcasted via [Clinical Video Telehealth (CVT) technology] for Community-Based Outpatient Clinic (CBOC) patients to attend.🔗
"So, one of the other things we did … is that we sort of just collected and put into one place all of the available programs and gave that to staff. And we did it in two formats. This is the alphabetical format. But the other format we do is a calendar—one where the days of the week and the times. And although I'm here in [Site 1], we also are responsible for [CBOC] and [CBOC2], which are Community-Based Outpatient Clinics. So we included those in the scan. And some of the stuff gets CVT'd too. It will be offered here but it's CVT'd to [CBOC] or to [CBOC2] and might capture those patients who otherwise wouldn't get it because it's hard for them to travel. It's expensive to travel from [CBOC] there's this huge toll. So we try and make things a little bit easier for the patients by doing that." —Health Promotion Disease Prevention Coordinator🔗
Create and regularly update a Veteran's Health Care Guide that describes different programs.🔗
"I think what makes people satisfied is that they're kept informed. They need to be kept informed of their care, they need to be kept informed of the medications that they're on, they need to be educated about all of that, and that's the biggest thing. And any new programs that are happening at the VA, I think the Veterans need to be informed about." —Patient Advocate🔗
"One thing that we came up with, I didn't even bring this up yet, is called the Veteran's Health Care Guide that we did just specifically for [site 28]. And in that book has basically all of our programs that we offer here at [site 28]. It's about a 60–65-page booklet that we put out into the clinics for the Veterans to take. And then they can read up on some of the new things that are happening at the medical center, such as the Choice program and just different things that come up over the course of three months, six months or a year, that fiscal year. And we keep updating that book as much as possible to stay up-to-date. So probably, every three months, every six months, we put out the new book into the clinics for them to take, and that can out of a strategic planning initiative many years ago, and we still do it today. I know that that was kind of a best practice that was put out there a couple of years ago by the VISN, and that really works well." —Patient Advocate🔗
"Oh, yeah. To be quite honest, if I order a thousand of those books, they're probably gone that same week. That's how popular they are. And when I go to the clinics to deliver them, all the clinic clerks always tell me, oh, my, can you bring us more? They go as soon as you put them out. So, yeah, that's why I say communication, education is the biggest part of what we have to do at the medical centers." —Patient Advocate🔗
"When I first came into the system, no one told me about travel pay, I learned that from other patients. To me, that is something that should be presented when you begin. You should be aware of what benefits you receive." —Patient🔗
"Better educate the provider about all the availabilities the facility has and maybe the outside facilities that they can use or what referrals they can put out to the patient." —Patient🔗
"I'd like to get something in the mail saying of their services available or upcoming services, time to get my annual check or follow-up, a reminder … I wouldn't mind getting also something announcing the services that are being offered [to] females at the VA and a number that I can call." —Patient🔗
Feedback🔗
Record clinical encounters🔗
Create audio or video recordings of clinical encounters to provide feedback to staff🔗
Partner with patients to record clinical encounters and compare the audio recording to clinical notes. Give the provider feedback for improvement.🔗
"We also asked real Veterans to audio-record their visits. And then we listen to those audio recordings and look at the notes. So, for example, the Veteran came in and their hemoglobin A1c has gone way out of control, you know, loss-of-control diabetes. Did the Physician ask, 'Why,' like, 'What happened, how come your diabetes was so well controlled, now it's not?' Because usually that's a sign they stopped taking their meds or their diet's changed. And what we didn't want to see—what we don't want to see—is just the physician adding on more meds, 'Oh, we're just going to go up on your insulin, we're just going to add another medicine,' because that's not really figuring out why that person is having trouble. And it's not going to really solve the problem. And so we call that contextual error because it's really an inappropriate kind of care. It looks good on paper. Like on paper in the note CPRS [Computerized Patient Record System] 'Veteran's diabetes was poorly controlled so we went up on their insulin.' But if, in fact, the reason it went up out of control is because the Veteran is now working as a truck driver and he can't take his insulin the way he used to, adding more insulin isn't going to fix that problem." —Primary Care Provider🔗
"This has got to be some way that they should be tested or should be elevated when somebody comes in, you know with … a secret shopper … have somebody come in … because I'm just telling you … your first impression is your last impression and that's a terrible thing to go off of especially when you don't feel good and you feel lost and you have nobody else to help you and the person that is supposed to be helping you doesn't even care, doesn't act as if they care. I think that is monumental." —Patient🔗
Have the PACT Psychologist videotape and review clinical encounters to teach primary care staff to provide better interactions and care.🔗
"We have a primary care staff Psychologist that's embedded in our primary care department, and another thing that they do is they video tape provider's sessions with the permission of the Veteran. And then what they do is they review that interaction with the providers … And that just shows strengths and weaknesses in that interaction between the providers and the Veterans." —Primary Care Nursing Leadership🔗
Offer feedback opportunities to all PACT staff.🔗
"The Pharmacists actually asked us to start including them. Originally, we were just doing audio recordings with Physicians. And then we were presenting them at PACT meetings and people realized how useful it was and how safe it was and then they started asking us to include them. So, people are very supportive if they realize that this is good for Veterans and it's interesting and it's not going to involve any work on their part." —Primary Care Provider🔗
"And then we started a quality improvement project where we started inviting Veterans to audio-record their visits. And then we would listen to the audio recordings, identify the gaps, really the missed opportunities by Physicians. And actually, we added on doing this with Nurses as well and then Front Desk Clerks and Pharmacists. Because there's always an opportunity for every employee to interact with a Veteran to figure out what's going on in that person's life and make sure that the care plan fits." —Primary Care Provider🔗
Increase feasibility and effectiveness of quality improvement projects by safely recording clinical encounters and reviewing the findings during PACT meetings. Ensure the activity feels safe and non-punitive to staff.🔗
"So, the VISN has supported the cause of our coding the audios because we have to listen to these audio recordings. We have a team that does that and identify the missed opportunities and provide that feedback. So, they provided some funds for that … and we present the data to Physicians at their standing PACT team meetings so it doesn't require any additional time or work on their part … And the audio recordings are done during usual care because they're done by Veterans … and finally it has to feel safe. It's got to feel like the data will never been used against a Physician … or a Nurse or anybody else who we're providing feedback to. It's like peer review in that sense. I think it's unique in that … it's the only example I know of where quality improvement is based on data collected by the Veteran of their own care and during a visit and that is actually intended. And it allows you to identify missed opportunities." —Primary Care Provider🔗
Videotape Primary Care Providers, with permission, as a part of their performance pay.🔗
"Part of our performance pay is we actually videotape our primary care providers with our patients … So, this is our third year of doing it actually. We … don't require, but it's part of performance pay—but all of them do it. They have to videotape a day of patients, twice a year. And our—[name of Counseling Psychologist], who does our motivational interviewing and gives feedback to our providers as to how they're doing. And what better ways they can interact with Veterans." —Primary Care Lead🔗
"So, there was some initial resistance … but all of the VA staffed providers participate in that … It's the provider interaction that we're really evaluating … This allows us to see really what's going on … They're not graded on how they're doing it … The performance pay isn't how well you did on your videotaping, it's that you did the videotaping. So that keeps that end confidential, but it also allows freedom to have real interactions. It's kind of saying, 'Hey, just do what you normally do. Don't put on an act for the camera. Do what you normally do, so she can give you some honest feedback on things to improve.' And actually what it's actually really developed—a couple of my providers actually specifically say, 'You know what? I want to do this day because I have these three difficult patients, that I want to learn more to interact with those patients." —Primary Care Lead🔗
Establish an advisory committee🔗
Establish a primary care advisory committee with Primary Care Leadership, core and extended PACT members, and a Patient Advocate to plan process improvement🔗
Create an interdisciplinary, PACT-specific steering committee that meets every other week that includes Nursing, Pharmacy, Scheduling, Specialty, Community-Based Outpatient Clinic Managers, and Community-Based Outpatient Clinic Nursing Managers that addresses issues of patient-centered care.🔗
"We have a PACT steering committee—which is interdisciplinary—that meets every two weeks. It includes nursing, pharmacy, scheduling, specialty, [Community-Based Outpatient Clinic] Nursing Manager. It includes administration. So, between us as the PACT steering committee, we can make changes that are more patient-centered … So, take for example … this is something that was implemented last year, but it's had a great, tremendous impact on patients. So, we had the dental clinic, we had specialty clinic, we had behavioral health clinics and we had primary care clinics for example, and you had to check in for each of those specialties because they were on different floors at locations. And if you had a primary care one, you had to check in for primary care. And then if you had a specialty one, check in for specialty care. You also had a mental health one, you had to check in a third time for mental health. And if you needed a follow up appointment, where you checked out of primary care, you got your primary care appointment and when you had specialty you had your specialty care appointment. And if you had a behavioral health, you had a behavioral health check-out, too. So, a patient could check in and check out and have six or more things—and rehab's the same way." —Primary Care Lead🔗
"So, what we did was we did centralized scheduling. So now the patient checks in and checks out in one location. And the kiosks also check them in for all their appointments. And it tells them where to go to sit for each of those appointments. But it really has assisted the patient also because when they check out of primary care, if they have consults, they get their consult appointment for audiology right then and there. We have a flow sheet that they check those off, but we also put orders in the computer. So, they know if they have a consult up to get a knee brace, they can actually just go up and get the knee brace right then and there. They don't have to come back. They have an audiology appointment or they have a specialty care appointment, they leave, getting those appointments." —Primary Care Lead🔗
Create a small Primary Care Leadership Team consisting of a Nurse Executive, Primary Care Provider Leader, and Administrative Officer to discuss strategic planning.🔗
"I think primary care has always been very collaborative in our approach … we went from that service line model to an integrated model in our leadership where we have an associate Nurse Exec, we have an MD leader, and then we also have an Administrative Officer that talk together and participate in training and strategic planning as best we can." —Primary Care Lead🔗
"I'm working with the Chief of Primary Care on a very small work group, a sub-committee of this PACT council, and it's related to patient education. We have a Veteran Family Health Education Committee, but we wanted to look at it specially from the PACT council and create some standards of how patients are educated by the Nurses and the Practitioners … What is our—it's called the PACT Patient Information/Education Committee … And what we consider education is disease education, what we consider information is this is how VA does this particular thing. So, information is how you work within the VA system and education is about your disease or your illnesses. So, we're trying to kind of pull it all together and create the best way to present both information and education to the patient." —Patient Advocate🔗
Designate a staff member (e.g. Associate Chief Nurse) to support, manage, and implement the quality improvement goals of PACT teamlets at VA Medical Centers and Community-Based Outpatient Clinics.🔗
"My role as a Clinical Nurse Specialist for primary care service line is basically quality assurance and performance improvement. So, I work really close with our VP [Vice President], [Doctor], and our Associate Chief Nurse, and [program manager] to look at processes. For example, quality assurance—do the current guidelines and standards out there actually meet what we're practicing, not only within primary care service line, not only for the facilities, but for the [Community-Based Outpatient Clinics] as well? And if they're not meeting, my job is to … help map out that process. And then after that process is mapped out, help all the stakeholders or actually working with the stakeholders to make sure that they follow that process. So, again, we're practicing not only standard of care, but recommended care and best practices throughout the whole primary care system." —Clinical Nurse Specialist🔗
"Performance improvement, if we recognize something that we could improve on, and that could be things like resource utilization. Maybe we're not utilizing our [Licensed Practical Nurses] to their full potential. So, then my role would be that liaison to say, 'Okay … so here's … what we could maybe be doing better, and then setting up work groups to try to map out that process. And then again drawing it out to the full service line." —Clinical Nurse Specialist🔗
Use advisory committee meetings to track quality improvement efforts, discuss systems redesign efforts, share survey feedback results, and brainstorm solutions to ongoing challenges in primary care.🔗
"We have carved out time for systems redesign. It's very important. And there is time for discipline-specific meetings. We're pushing people toward huddles … but beyond that, it's just a lot of us moving around all the time and making personal connections with people … We're all extremely mobile … because it's required." —Nursing Staff🔗
"We also have a customer service representative by the name of [First Name], and we have a PACT steering committee that we developed—it's been a few years now—but we meet every other week. And she actually does what's called the Voice of the Veteran Survey where she does reports. She will call patients and ask them—it's like a satisfaction of the Veteran on their health care experience, and there are different facets of it. One is provider satisfaction, and one thing that she likes to do is if they're not happy with their experience that they had, she'll drill down on the reason why." —Primary Care Nursing Leadership🔗
"The first item was a review of the number of patients that were "no shows" in a one-week period … After the data review, the group began to brainstorm on ways to improve the 'no show' rate … The next topic of discussion for the group was an update from the HPDP on an upcoming event. There was additional discussion on the desire to get all of the staff 100 percent trained and to teach refresher courses for eligible staff … the group moved on to discuss their plans to reach out to high risk patients." —Observation notes from a PACT steering committee meeting🔗
Appoint Patient Advocacy Liaisons🔗
Appoint Patient Advocate Liaisons in each department to help manage department-specific patient complaints or concerns🔗
Have Chiefs of departments identify Patient Advocate Liaisons to address and resolve local issues before they go to the Patient Advocate or Leadership.🔗
"We wouldn't be able to do our job without working with other people. So, we have what are known as Patient Advocate Liaisons—these are PALs. These are individuals that have been identified by Chiefs of departments and pretty much when there's an issue in that department, they're supposed to resolve that issue first, if they're able to. Or if that patient comes directly here, then we would connect with that patient advocate liaison and resolve their issue. And then if it needs something that maybe takes a higher level, we would bring it up to leadership then." —Patient Advocate🔗
My Toolbox
You currently have no toolkit items selected.
Export Toolbox Text
Copy (Ctrl + C) from this window. Then paste (Ctrl + V) elsewhere for minimally formatted text.


